Wednesday, April 28, 2010

Once Upon A Time In A Little Kingdom...

...Lived a beautiful little princess who had a pretty pink dress. Her aunt and cousins gave it to her to play dressups and the princess loved it very much.  
One day the zipper broke on the pretty pink dress and the princess cried and cried.  
The little princess's fairy Mother stepped in with her magic wand,
{wand was made using a tutorial from Little Birdie Secrets}

And made a pretty new skirt for the princess whose favorite princess is Cinderella.
She had wanted to make a skirt like this one ever since she had seen V & Co's ruffled scarf.
She used simple blue cotton for the skirt and strips of cotton and tulle for the ruffles.
Perfect for the girl who wears glass slippers wherever she goes.
And the little princess lived happily ever after.  

{You can see Ivy telling the story of Cinderella HERE}

 
Photobucket

Tuesday, April 27, 2010

A.. A.. A.. what begins with A?

I made Ivy and alphabet book over the weekend.  She LOVES animals and when I saw this idea who knows where a long time ago I knew she would love it.  BUT I couldn't find the cards anywhere.  I just happened to be lucky enough one day to find some at Craft Warehouse.   So I punched some holes and looped them all together with D-Rings.  I tied ribbon on the rings right over the slits so the pages couldn't come off.  
The jellyfish is my fave.  And the fun surprise is all of the interesting facts on the back of the cards.  Did you know that honeybees kill more people than all of the poisonous snakes combined?!  Yeah me either.
{The cards are K&Company A-Zelephant} 
Photobucket

Monday, April 26, 2010

Get to Voting!

Blog Button 
The sweetest gal Chelsea from right here it Tri Cities has opened up voting for her Mothers Day Makeover on her rad blog Make You Over.  So go check it out and vote for one lucky Mom to get the royal treatment just in time for Mothers day!

Photobucket

Thursday, April 22, 2010

Waiting for the Flood

Remember when I said that Ivy was growing like a weed?  These pants were the perfect length 3 weeks ago.  Everything else about them fits just fine, and they are some of my favorite pants she has.  So instead of putting them into a bin for someday I' decided to put them to good use.  
I took one leg and folded up at about the height I wanted.  Can you see how I folded it in by bring up the hem?  
 Here is what it looks like from the inside of the pant leg.  
Pin it in place really well.  Making sure to match up the side seams.  Do you like my new pretty red pins?  I hate pinning mostly because I hated my crappy pins.  So I got some new ones. Maybe if they are pretty I will enjoy them more
Sew right down the other stitching lines. A little side note is that if you think your machine will have a hard time going through those thick denim side seams, just turn you wheel by hand to prevent needles breaking and that annoying "your machine is going to blow up" buzzing sound.  
 Now she's got some new capris!  This works best with a trouser style or wide leg pants, that has a larger hem at the bottom.
She's still waiting for the flood, but in a much cuter way!  


Photobucket

Tuesday, April 20, 2010

What are you doing?

Today I am working at Greenies while Darin is teaching photography classes at a local high school.  I brought my sewing machine in with hopes of getting some stuff sewn but at this rate probably not.  I've got a customer coming in at 4 to talk about making clothes for her twin kids.  She is getting married in Mexico and wants some thing "beach formal".  Is that a style or did I make it up?  

Friday I'm going to be doing THIS.   Hopefully I will finally get to meet all the fabulous Tri Cities bloggers that everyone keeps telling me I need to meet.  Especially since in a round about way I'm kind of related to half of them.  

And next week?  I'm going to be doing 
that.  You can get all the details at Grosgrain.  The dress she has picked out is super cute. I'm excited to have a new dress for Mothers Day {my least favorite day of the year by the way}.  

I took this challenge {started April 1st} and so far so good.  Because lets face it.  I get much more excited about buying fabric then going and trying to find a new dress.  Plus I've never made a dress for me so it will be a new challenge. 

So thats what I'm going to be up to for the next couple of weeks.  How are you challenging yourself these days?
Photobucket

Monday, April 19, 2010

The Summer Vacation Shortie

I was working on Ivy's summer wardrobe over the weekend.  Its 80 degrees again today! I think I'm getting anxious for the nice weather because pants that were just right on my baby girl two weeks ago are too short this week.  And shorts weather plus no diapers means she can still wear her shorts from last year!  I swear she only grows up not out. 
 And this is probably the last summer I can get away with putting her in a bubble romper.  They are my absolute favorite thing a little girl can wear.  I used the new Summer Vacation Dress and Shortie pattern from MADE.  These will be for sale in Greenies  towards the end of the week.  Made from both super cute fabric and upcycled from old t-shirts, these shorties and dresses are the perfect way for your little girl to spend a summer {or really nice spring} day!

Photobucket

Saturday, April 17, 2010

Don't knock it until you try it.

Probably a year ago my SIL introduced me to a fancy way of making fish tacos.  We were skeptical at first but now this is seriously my favorite dinner.  Especially with that chipotle dip I was telling you about.  
Wanna make some for dinner tonight?  Well you need to boogie on down to the store and pick up some fish sticks.  Yep you heard right, fish sticks.  I prefer the ones from Costco.  And you are gonna need your favorite taco fixin's.  Mine has Chipotle Dip, avocado, lettuce, cilantro, cheese,olives and lime.  It takes two fish sticks per taco.  And yeah I tried being even fancier by using more of a breaded fillet, and we all agreed we liked the added crunch of  the fish sticks better.   

FISH TACOS
fish sticks
tortillas
taco fixin's

Bake your fish sticks.  And then make tacos with them.  YUMMY.  Seriously don't knock it until you try it. 
Photobucket

Friday, April 16, 2010

{CHIPOTLE}

 Okay so I mentioned earlier that my other favorite things right now were chipotle and avocados.  Actually my favorite is combining the two.  At the Denver farmer's market a lady sold an amazing chipotle dip.  We love it so much that last June when I was there packing up our stuff I made sure to go to the farmer's market and pick some up.  I asked her how long it would last and she said for a really long time.  SWEET!  I picked up four.  Sadly we are scraping the sides on our last one.  
So I decided I better figure out how to make some before it was gone so I could compare.  It was way easier than I thought.  I just googled chipotle dip.  Ta Da!   I couldn't tell you the exact recipe cuz I just kind of got an idea from the recipes and went from there, but here's what I did.  

CHIPOTLE DIP
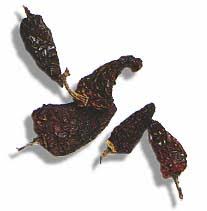
2-3 chipotle chiles from a can
1-3 tsp adobe sauce from the can(depending on how hot you want it)
maybe a cup of mayo(i use light)
2 cloves of garlic minced
lime juice from half of lime
probably 2 Tbsp chopped cilantro

WEARING GLOVES {very important} chop up the chiles to a paste.  Then add everything to a food processor and process until smooth.  Add the mayo slowly until it looks like a good ratio.    The gloves part is important because you DO NOT want to touch these and then touch your eyes, nose mouth or your kids. Even if you wash your hands really well it can still get ya. 
I know you're thinking Gee thank Jenn sweet recipe.  But I don't have time to make some more so you are just gonna have to wing it too!  Or just google chipotle dip.  And I know this is a long post about a dumb pepper but here is the exciting part.  It is so yummy on sandwiches~think turkey/bacon/avocado, hamburgers, or as a dip.  My favorite way to use it is Fish Tacos.  I was going to share but I think that's what we are having for dinner tonight so I'll take some pictures and share tomorrow.  Want some different ways to enjoy chipotle?  Check out these awesome recipes via Our Best Bites!


sorry for the lack of pictures!

Photobucket

Thursday, April 15, 2010

Gathered Pillow

When I was in Portland last week I got to go fabric shopping by myself!   It was very exciting.  I had been wanting to go to a little store in NE Portland called BOLT.  It is an area called the"DIY District".  Lots of cool shops and really fun area to check out.  This is my stack of fabric I got.  I came home and my sister said "I thought you were going to come back with $100 worth of fabric?!" And while this isn't $100 worth {only $40 Darin, don't freak out!} splurging on the good stuff doesn't get you so much..  The top green is Nicey Jane by Heather Bailey which you'll get a better picture of in a minute.  The pink  has a awesome lime green damask on it and blue I don't know what they are but super cute, black polka dots~imagine that~ and the gray is Organic Bamboo jersey.  That was the one I'm most excited about because you just can't get that stuff here.  .  Here is my ruffled project for the day...
isn't that Nicey Jane so pretty?!
It didn't turn out exactly as I pictured and I know technically its gathered but its the same idea.  I'm trying to add more color in our house.  And I'm trying to be better about mixing up fabrics that aren't from the same line.  So while Ivy was taking a nap after her 3 hours of bliss at the park I whipped this up.  I think I would do the gathered section a bit smaller next time but overall I love the effect.  
Hopefully I can find something ruffly that I can take pictures of and post for tomorrow cuz I'm looking to be outside ALL day tomorrow.  80 degrees WHAT!
Photobucket

Squeaking It In

Ok so its 11:30 pm and I technically didn't ruffle anything today.  I have an excuse though, the weather was gorgeous and we just had to go to the park~twice.  And I'm in the middle of making two purses for my sister in law who I just can't picture with a ruffly purse.  We'll see.  The first one I am totally making it up as I go.  So far, "sew" good!  But I'm not going to let you down if you were wanting your daily fix of ruffles.  Here are some ruffle projects that I have bookmarked to do sometime in the near future...
image via 2 Giggle Boxes
How gorgeous is this Rufflier from 2 Giggle Boxes?!  I got the biggest smile on my face when I saw it and I need one.   You have to check out the whole "tRuffles and tea" party.  No wonder she snagged the second place prize in the Ruffle Your Stuff contest!

The queen of ruffles is indisputably Disney of Ruffles and Stuff.  I'm loving her
image via Ruffles and Stuff 

With all this talk of ruffles are you wishing you could make your own ruffles?  HERE is a great tutorial at 

What are YOUR favorite ruffled things you've seen?!
Photobucket

Tuesday, April 13, 2010

And So It Begins!

The first bounty of the season!  Ok so I didn't grow the asparagus.  But this is one of the benefits of living in an area surrounded by farmland.  The produce here is fantastic and so readily available.  My sister in law and I drove out to a farmstand this morning and got 60 pounds of asparagus fresh picked earlier in the day.   YUM! 
Photobucket

Monday, April 12, 2010

Ruffles Inspired By The Gap

When I was in Portland last week I of course had to go shopping.  Even though I wasn't buying anything, the thought of going to a descent mall is so exciting to me.  My hometown mall even has a Forever 21 that is JUST accessories!   All you big city folks can just have a small laugh at my expense on that one.  We even went to Anthropologie which I could spend a great deal of time in looking at every. single. thing.  But where did something catch my fancy?  The Gap.  Now don't get me wrong I love the Gap, but we do have one here in Tri Cities.  The reason this shirt caught my eye though was that I already had everything at home to make it!
All you need is about a yard of ruffle eyelet trim {or more if you want more ruffles like the original} , a shirt and your basic sewing supplies like pins and a sewing machine. 
Starting at the shoulder seam start pinning your trim right at the edge of the neckline on your shirt.  Pin all the way around to the other shoulder seam.  Oh look I even used a Gap shirt to make it more authentic;)
Sew right over the stitching lines on your trim, making sure that you are catching the shirt underneath.
I started my second row about 1 1/2 inches down from the shoulder seam and curved the end in under my top ruffle.  Then pin all the way around about 3/8 inch away from your first row of ruffles, stopping 1 1/2 inches from the shoulder seam again.  Sew that row of ruffle trim and repeat for a third row {or 4 or 5 whatever you want, I just went for 3}.
Here's the finished shirt.   The best part is by using trim the ruffle-ing is already done for you!  Making this the easiest thing I have done in a long time.

WOOT WOOT!  An updated Gap shirt for free~I already had everything I needed, and now I'm a little bit more stylin.


DIY Day @ ASPTL

Photobucket

Photobucket

LinkWithin

Related Posts with Thumbnails