Showing posts with label wood crafts. Show all posts

Tuesday, November 19, 2013

Branchlers {a simple diy}


Branchlers! I've had a crafting itch lately and this was the perfect easy and fast diy to do during Axel's nap yesterday.  I even got the floors swept afterwards.  The hardest part (as always) has been deciding where to hang them.


Supplies...
a scrap of leather, wood plaque, paint, furniture tack or small nail, branch.

I collected all of these things from my craft room and the the branch I got from a tree in my backyard making it free, which I love.  If you don't have a black hole called The Craft Room then you can get the plaques for $1-2 at a craft store and while you are there you can get a grab bag of leather scraps.  I promise you will find other ways to use the leather.  


Start by painting your plaque.  While it is drying cut a piece of leather long enough to make a circle to fit around your branch.  Using a hammer, pound your nail in each end of the leather to punch holes. 


Put your tack through the holes to make a loop and then pound it into the plaque.


Set your branch into the loop and just like that you've made branchlers.  


Photobucket

Wednesday, January 26, 2011

Glitter Hearts make me happy.

How do you like my newish digs {again}?  I can't help it.  I just have too much fun, trying out new stuff and the holidays just need to be decorated!  I've got a little valentine project to share, but I wanted to point out a couple of things real quick.  I've been cleaning things up and working on adding pages, so those big words over there will take you to things like how to get a hold of me, my shop, blogs I like to look at... stuff like that.


I also had a moment of crazy the other day and signed up for twitter.  I have no idea what I'm doing on there, but I would love for you to come and follow along with me, and I'll follow you too!  My handle{?} is @ruffledsunshine. Do you say handle in the twitter world?! See. Crazy.  I need twitter lessons.

+++
I'm slowly learning that Valentines Day is a holiday you have to get a jump on.  If you don't it sneaks up on you and then you are scrambling.  I got a little push the other day when I got to help style a  Valentines photo shoot.  I can't wait to show you how it turned out.  It was kind of really amazing. 

{oooh,  a sneak peak ; P }
 
Since there has been very little crafting going on here at this blog I thought i would share one of the little things I came up with. 
 Ready to get your heart on?

At Christmas we got a slice of a tree from Darin's Grandpa.  I got to brand it and everything.  It was all very exciting.  And now its perfect for the photoshoot.
  

I cut a heart out of vinyl on my Silhouette.  I didn't use the heart though, I used the negative space as a stencil.  Vinyl is awesome that way.  I love it when things pull double duty.  


Place your stencil on your wood, or whatever you are stenciling. Make sure and seal the edges really well, especially if you are using paint.  

I've been feeling all of the sparkly stuff lately so I went for mod podge and glitter on this one.  Paint your mod podge on pretty thick then dump on some glitter.  Joann's has started having some holiday colors of glitter in their dollar section.  I love it because I don't have to try so hard to save every speck of my $5 glitter.  Once it has dried a bit dump off your excess glitter and then mod podge OVER your glitter.  I know it looks scary but it does dry clear.  I promise.


After it dries, take off your stencil and you're done!  Its a simple project, but I love how the glitter and wood go together.  Two things that aren't necessarily supposed to be together, but get along so fabulously. 


XOXO.

See glitter hearts make you happy too.

Photobucket

Wednesday, September 29, 2010

Proclamation to the Family {mini tutorial}

Want to win a photo session from DW Photography?!    Click HERE for all the details!  Or just scroll down to the next post!

We've been getting our crafts ready for Super Saturday eh that one day of the year where our Relief Society gets together to uh learn some important skills. ;) Yep even though it isn't until November 6th, we are in full swing planning and executing our ideas.  The tricky part is coming up with ideas that are purposeful AND don't cost a lot of money.  Luckily we have managed to do that and we came up with some great stuff! 

 :A little teaser for all my Pasco 1st Ward ladies!:

My sweet friend Celia {she's right down there in that photo!}is a graphic designer and had reformatted the Family Proclamation.  We went round and round on how to make it a craft in a larger format and then I thought:  What about going smaller?! So here is what I came up with.


 I started with 3 blocks.  Two that are 5x7 and one 1.5x7. 
 First I painted the wood black, let it dry and then modpodged on a family photo.   


Then I added my vinyl to the small block.  


I  modpodged the proclamation on my third block.  After all three were dry I sanded the edges of the blocks and the paper AND the picture.  Then I used my distressing ink pad {walnut stain} to distress the edges a bit.  Doesn't wood always look a little better distressed?


It would also be cute if you used a 4x6 photo and put some scrapbook paper behind it.  You could also add any kind of embellishments that you wanted.   Kind of fun huh?
Just a little bit more personal way to display the Family Proclamation.  


EDIT!  CLick HERE to get your proclamation download.  

Photobucket

Tuesday, September 21, 2010

Craft Projects for Project: Craft

Happy Fall Everyone!  
Ivy and I spent the last week in Portland so we are still getting back in to the groove around here.  It is always super fun hitting up the Big City!  The highlight for me was actually taking Ivy to the Children's Museum.  If the fire alarm hadn't gone off after 4 hours of playing we probably would have just stayed all day!
Well Project:Craft is this Saturday and after getting my ticket in the mail over the weekend I am getting super excited.  I just don't know what to bring as a craft!  And you probably haven't either I'm guessing ;).  So here's some ideas for you! {and me}

  I just pulled out my Halloween countdown and still love it!  
{I've got kits available for Halloween or Christmas.  Just email me if you want to make one!}
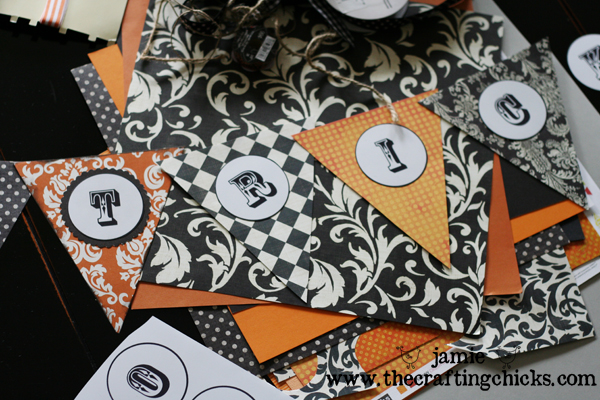
A pennant banner!  The Crafting Chicks share a super cute halloween one! I'm in need of a birthday one myself...
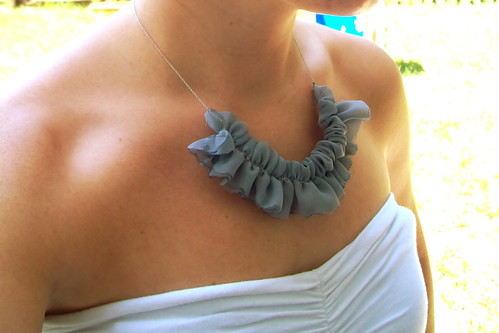
Not in the mood for a Halloween project?   How about this really cute ruffle necklace.  This has been on my list for a while so maybe its time to cross it off!
Or how about heading over to Target and picking up a pair of Odell Flats for a shoe refashion? 
Did I help you out at all?! What do you want to make this week?  {Whether you are going to Project:craft or not!} 
Photobucket

Thursday, August 12, 2010

Memory {Summer Edition}

Homemade gifts are always the best.  Even when three year olds don't fully appreciate it. 

 Case in point, Ivy's Memory game I made for her birthday.  Someday she'll appreciate I'm sure.  
I've been wanting to make her this game for a while and her birthday gave me a good push.  Want me to show you how to make one?  Ok.  I will anyways ;)


I used these 2 inch chipboard squares from Craft Warehouse.  I even got to use a 40 % off coupon.  Sweet ! I spray painted both side white cuz its A LOT faster to spray paint 24 squares then to use craft paint.  While those dried I cut that cute blue and white polka dot paper up there in to 1 7/8 inch squares for one side and put together a sheet of images for the other side.  


I used images from LD Summer Popsicles and Treats and LD Seven Seas to make a sheet with 12 different pictures of some of Ivy's favorite summertime things.  I sized them in photoshop so they were 1 1/2 inches square and spaced evenly in a 8 1/2 x 11 inch document.    I then printed out 2 sheets on white cardstock and cut them in to 1 7/8 inch squares .  
{side note: Lettering Delights is awesome.  They have free stuff all the time and huge sales.  I haven't paid more than 20 cents for something.  Plus they keep all of your stuff in a library for you, and bunches of other cool features.  Check it out!}


I then modpodged the blue squares to one side of my now white chipboard, let them dry overnight and then the pictures to the other side.  
Tada!


A game perfect for ages 3+ (just like the box says!)


I had the perfect bag for our game, but it would be fun to decorate a box for one too.  I'm thinking this will be perfect for Ivy's cousin who also turns 3 this week.  There are so many different themes you can do too.  

+numbers or letters
+holidays
+boy stuff or princesses
+animals
+or my original idea of family pictures!

If you make one ever I wanna see!  

giveaways

  
Photobucket

Wednesday, July 7, 2010

Picnic Table Date

For our date night one night {oh...2 months ago!} Darin and I built Ivy a picnic table from Knock Off Wood.  It actually turned out to be really fun AND we got it built in about 2 hours.  Not bad considering thats how long it takes to put any other piece for furniture that you get from Target together!  
The instructions were descent and I think the only thing we could have done different was to have clamps.  But it doesn't wobble which makes it perfect to me!  I will say that it cost a little bit more than the  $15 dollars she said it would since we had to buy all of the screws and a square, plus the paint was on the spendy side.
After Darin and I put it together Ivy and I primed it out on the grass.  She had such a great time painting it.  I just had to follow around behind her to wipe up drips.
I even got a good enough picture to print out!


That is when I got my Valspar Crystal Aqua paint.  I used outdoor semi gloss so I can just hose it down after Ivy eats half of a watermelon!  I distressed the edges but didn't stain them since I knew it would be outside and get that look naturally.  
 Here you can see the only way we strayed from the plans is to use 1x8's for the seats instead of the two 1x3's so that kids didn't get arms or legs pinched. It was a fun project.  It might have been cheaper just to buy one from Target when all was said and done.  But now we have something we all worked on and I love it that much more!

Photobucket

Monday, November 23, 2009

Joy Blocks

UPDATE!  I made these at Christmastime but I still love them and have some more beadboard cut to make something spring-y!
I loved these Joy Plaques on Shanty2Chic and wanted to give them a try for the holiday bazaar.  I think the whole black and white and burlap is really pretty.  But I had gotten a sheet of beadboard last time I was at the hardware store so I decided to use that instead of burlap.
Here is the first set I did.  I used vinyl letters on the beadboard then hot glued them to the wood blocks and pounded in some upholstery tacks.   I ended up not doing the candlestick thing because I didn't want to spend the money and time(it was a last minute addition to the lineup.)


I liked the black and white but I LOVE color and had an idea when I first started thinking about doing these to use a poinsetta for the "o".  I took all the plastic off of the flower and hotglued it back together, adding a vintage looking pearl button.  Then I glued it to the beadboard.  Also under the beadboard I mod podged on some scrapbook paper.  This is a really pretty green paper from the mistletoe line by Making Memories.
(sorry if its hard to tell I was taking pictures of these as I was wrapping them up at 11 pm!) 

This one is my favorite even though it doesn't match my Christmas decorations.  It is a paper I had in my stash that is aqua with red and cream on it.  Its hard to describe but I love the whole combination!
(Click on the pictures to get a better idea!)
 
 
 I painted these blocks red and used the black and white polka dot paper from the Mistletoe line.  These were my mom's favorite.  I must get my love of polka dots from her!
I'm giving Darin a break from cutting wood this week, but next week I'm gonna make another set, with the candlesticks I think.  And I need to make some for my Mom for being such a HUGE help this past weekend.  Let me know which ones you want Mama!

(EDITED) I'm linking these to DIY Day at A Soft Place To Land.


DIY Day @ ASPTL

LinkWithin

Related Posts with Thumbnails