Showing posts with label i heart picnik. Show all posts

Tuesday, April 10, 2012

Insanity.


*** I know you guys really don't care about these exercise updates, but I feel the need to own up to it more and try harder if I'm putting it online.  Don't hate me!***

 You know how I finished P90x?  Well right after we finished that we jumped right in to Insanity.  Umm its insane, and I pretty much hate it!  It is a cardio workout from the same company that does P90x.  It is ALL cardio, so basically the complete opposite of what I had been doing before.  When we are finished I am all red faced and I stink and sweat is dripping down my face.  Want to know the most annoying thing?  I have to wash my hair every day.  I hate that, just sayin. ;)

For Insanity they have to do a fit test every two weeks and take your measurements.  Here are my results after two weeks...

Not bad for two weeks.  I have been trying harder to eat more healthy with this program so I think that has helped quite a bit, and my energy has been way up. Or it was until I got sick, BOO!!  I was down for about 4 days but I am still feeling so worn out.  Mandy and I both got sick at the same time and had the same thing, so luckily I'm not holding her back.  Ugh.  We did our third fit test yesterday and I really thought I was going to throw up.  I'm stuck in that vicious cycle of not having good energy because I'm not working out, but not being able to work out well because I'm so wasted from being sick.  So we are on "recovery week" three!  Hopefully we are fully back to normal by next week so we can finish the dang thing.  Cuz honestly I want it to be over, like yesterday.

These numbers are based off of week 2, not totals for the whole program, does that make sense?  For example after week 2 I had lost 1 pound.  I lost another 1.4 pounds by week 5.  So far doing insanity I've lost 2.4 pounds.  Not bad for taking a week and a half off I guess.  Although it might have been better if I hadn't of bought that  bag of cadbury mini eggs a couple of weeks ago. Those things are like crack, seriously.  


Thanks for letting me post this stuff.   It really does help to keep me accountable.  To say thanks I've uploaded a blank notecard I put together for keeping track of my progress.  Just right click and save the image above.  Then you can upload it to PicMonkey {an AWESOME Picnic replacement} or use photoshop and keep track of your own results. 

Photobucket

Monday, May 23, 2011

Hello Monday.


Hello rainy monday.  I have to admit that when it is raining like it is today {and we have had a week of sun} I kind of like it.  It reminds me of home and makes me feel cozy.  As long as it doesn't stay I'm perfectly content to enjoy a day inside with my girl and a big pile of books.  Ivy and I have been playing camping,  reading book after book and playing with babies.    We have had a weekend of highs and lows so mellow is always nice.
  

We are getting sad this week that some of our family that we came here to be close to is moving away.  Funny thing is they are moving to Denver where we came from.  Ivy will miss Lytton who she always proclaims is her bestest friend and I'm going to miss my dear LoLo. So I planned a little girls night with just the aunties and Grandma to sit and chat one last time before she leave us for the Rocky Mountains.  {yes I'll admit I'm a wee bit jealous that they will be back in the mountains I love.  Although I'm not jealous of the snow in May.}

We enjoyed a few treats and sipped italian sodas with some happy yellow straws. . . 


turned down the lights and visited and giggled just like girls do.  


Parties are the perfect excuse to buy flowers... 


and to sew fun things and pretty up the place.

We are being brave  because we know our family will be back soon.  We are so happy for them on their new adventure. And Ivy will still proclaim Lytton to bestest friend and we will always love our crazy Lolo.  {and yes Rich we will miss you too!}  

How was your weekend?  And Happy Monday to you! 
Photobucket

Friday, January 14, 2011

Subway Art {free printable} and a winner!

First things first!  
The winner of Celeste's CORE 4 ab program is {according to R.N.G}...


#21


LOVELY LINDSAY!  


Seriously.  The stars are aligned {even if the earth is wobbly and we all have new astrological signs}.  My friend Lindsay is a new Mama and Random Number Generator couldn't have picked a sweeter girl.


Oh, Lindsay I'm so jealous of you!  Congratulations!  I'll be putting you in contact with Celeste to claim your prize.


{Thanks everyone for entering.  As a side note, if you want to enter giveaways, would you pretty please enable your email address on your blogger profile, or add your email in your comment?! It makes getting in touch with you so much easier.  Thanks so much!}


And another side note, is it really true that we have new astrological signs?  Because apparently I am now a Virgo and a Libra:  Virgo ends on my birthday and Libra starts on my birthday.  What the heck.
+++


I've been cheating on Picnik.  Shhh, don't tell, but sometimes a girl just wants a little bit...more.  Photoshop and I have just been friends for awhile but over the past couple of months it has developed into more than just friends.  We definitely have our fights but in the end we manage to patch things up.  Oh, I still heart picnik don't worry, I just am loving all of the things I've been mastering in Photoshop.  Ok, not mastering, but definitely getting better at.


Subway art is kind of everywhere right now, and it has been perfect for hanging out with my new love.    I made this one to show you my favorite fonts these days.  All of them can be found for free at Dafont except the ld adornment, which is from scrapnfonts. 


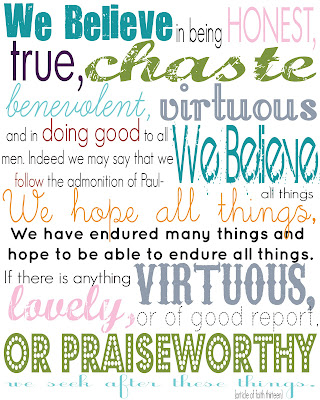
I mentioned the other day that I've been working in Young Womens for a couple of months now.  Every year my church picks a new theme for the youth.  This year is the thirteenth article of faith.  So I made this subway art for our girls.  I printed it out at Costco as a 20x30 and headed to Hobby Lobby.  My original plan was to Mod Podge it on a canvas, but I found a 20x30 piece of foam core that was sticky backed.  I think a ray of sunlight broke through the clouds when I found it.  It seriously only took 1 minute to put my print on and it looks awesome!   According to my girl Carra it is "epic"!  

I've gone ahead and uploaded it as an 8x10 so if you right click and save it you should be able to print it out for anyone you know that would need an "epic" print of the thirteenth article of faith.  A few of you asked about my BE one too.  So here's the 8x10 of that also.


{I hope it works.  Let me know if you have issues.}


Have a fab weekend! 

Photobucket

Wednesday, December 15, 2010

I Heart Picnik Part 3 {invitations}

Oh hello!  Here I am.  Did you miss me?  I have had a hard time sitting down these past few days.  Catching up after a trip always takes me a bit longer than I think.  We had a great time in Boise catching up with family that we don't see nearly enough of.  But thank goodness for facebook right?! ;)

When I was a teenager my parents started a tradition of pancakes and ice cream in December.  Well when Darin and I got one of those cool flippy waffle makers we decided to make it our own tradition.  So we invite family over and have waffles with ice cream.  Its much more fun if you send family invitations, even to dinner.  Besides when you have a good friend like Picnik why not?  After I did Ivy's pumpkin party invitations  I had a bunch of people ask me for a little tutorial. So I'm going to take you step by step on how to make your own evites! {or invites} This is also how I made that applesauce recipe card last week.


First go to Picnik and upload your background.  You can use a picture, a blank document that is the size you want, or like I did this time, some digital scrapbook paper.  I used one from this free kit.  Free is ALWAYS good!   Easy and cute.  My favorite kind.  Plus  I knew that this would go perfect with the tags in the new seasonal stuff.  
 

See?  SO cute right.  Once you have uploaded what you are going to use for your background, click on the CREATE tab.  This is where all the fun stuff is!  Under create the first tab on the left is FEATURED.  All of their Christmas stuff is there.  {Check out the winterize on a photo sometime.  I love it almost as much as cross-process.}  Scroll down until you find the tags.  There are some really cute ones to choose from.


Next up is adding your text.  I started with my big word first so everything else would fit around it.  


To get the same color on my second layer of text I clicked on WAFFLES.  There should be a little box that pops up with all of your options, and the color.  In the upper right hand corner just above the colors is the code for the color you picked.  Highlight it and copy it.   Then click on your other text.  In this case WHO WANTS.  Then paste your color code in to the same spot and it will match.  Pretty fancy huh!


Add the rest of your text with all of your party info.  Save and you are done.  Ta Da!  Now you can "hand out" these invitations through email or facebook  by attaching it just like a picture.  If you really wanted to you could print them out at Costco or at home or wherever.  Since this one is a 12X12 I could print it out as an 8X8 or 12X12.  But those are kind of expensive for an invitation.  Luckily, we are a facebook family!
{IF you are going to print out your invitations then you need to crop your background in the first step. Once you have uploaded your image it will go to the edit tab.  Just click on the crop button.  At the top will be a drop down menu that says no constraints.  Click on the arrow and pick the size you want.  Seriously, they make it so easy.   Then after you make your invite its just the right size to upload and print.}


 Mmm waffles.  Can't wait!


Photobucket

Thursday, October 28, 2010

Ivy's Pumpkin Party

On Monday Night Ivy hosted her First Annual Pumpkin Party.  She has been asking if it was Halloween yet for 2 months, and has been wanting a party if the worst way.  So we invited all of Darin's family over to carve pumpkins!

I turned to my trusty friend, Picnik to help me out with the invitations.  I saved a blank image  in photoshop the size that I wanted -4x8- then imported that in to Picnik and used their halloween stickers and fonts to whip this up.   Then I imported it back into photoshop so I could print three on a page.  I know, I know, sometimes I cheat on Picnik, but as much as I love it, there are some things it just can't do ;)


 After I  printed it out, I used my favorite Halloween paper and my big shot to decorate the other side. Check out that creepy spider shadow!


  We hand delivered the invitations then waited for our party.  After my apple-palooza this weekend I decided to buy all of the food go easy on myself for refreshments  We had chips and salsa, apples with caramel dip, and pumpkin donuts.  


Since I went the easy route on the food it freed up some time to make a couple of decorations!  {Cuz I would much rather do that then make cookies!}  I made some food label thingy's using picnik - of course- to put by the food and drinks.  I also put together a little banner using cardstock and some baker's twine. 


Ivy had a blast playing with her cousins more than anything.  It was all we could do to tear them away to carve pumpkins for a few minutes! Darin had elaborate plans for a witch, but he decided to go the easy route too, and went for the goofy smile instead.


And that, my friends is exactly why we moved here.  So we could do things like have pumpkin parties with our family and Ivy could be the bestest friends with her cousins.  Thanks Warnicks for coming!   
Photobucket

Monday, October 4, 2010

I heart Picnik part 2 {spookify your photos}

You know how I heart Picnik?  Well I also love Halloween {even more now that Ivy loves it}.  So when I logged in to Picnik on Thursday to edit some photos I immediately got distracted by their Halloween actions!  Ivy and I had a blast trying out all of the different stuff.  
 In the CREATE tab on Picnik, under FEATURED is where all of their Halloween stuff is.  Did you notice my picture on the side bar?

I turned myself into a vampire!  First up Vampire Eyes in yellow.  Then the Dracula Dermis {hungry} all over.  I added the fangs and sized them and turned them to fit my mouth.  Then I scrolled down to the stickers and added the bat sticker.  I faded it so it was a bit transparent.  Then add some spooky text and you've got a Spooky Profile Picture!
{before and after}

 After that I thought well why not "spookify"  my header too?!  So I did just that.  I went back to my original files.  *Tiny tip when making a header*.  Save just your first layer in the size you want.  Then if you ever want to do minor changes like fonts you don't have to figure out the width or color again.
  

Here's mine.  I wanted it to have the same feel so here we are at square one.  


The first step I did in photoshop.  I added this rad overlay.  Its from the Bootiful Overlays on Lettering Delights. {They are on sale for a $1!} I love the black texture it adds. 


Then I took it to Picnik and added the text.  First the orange at the bottom and then the gray.  I think this is WAY easier in Picnik than photoshop.  They have fun fonts and any changes show up right away.  Plus it is so easy to slide that size slider!  Isn't {easy} technology the best?!

Here's some more profile pictures...

 {glasses mask, enlarged and rotated}

{masquerade mask, enlarged, rotated, and turned pink}

Ivy said... Mom!  Look at your beautiful eyelashes! 

 {spider sticker, enlarged and faded.  Spiderweb}

I was amazed at how much you could tweak the spiderwebs.  Thin, thick, skewed, style, glowing.  And it was all on sliders.  LOVE IT!

So go forth fellow picnikers!  Spookify your blog. I want to see what you come up with!  It would be fun for your facebook photos too.  Oooh and to replace some of your smaller framed photos around the house!  or...or...


Photobucket

Tuesday, August 10, 2010

I heart Picnik

 I think I'm late in the game, but I have a new love.  I really do heart Picnik.  From their clever loading phrases to their bugs and grass everywhere.  It makes it fun to edit photos!  I do like Photoshop but it can be so darn frustrating sometimes.  Well I took some of my  pictures from my photos hoot the other night to show you some of my favorite effects in Picnik.

{cinemascope without the filmstrips + rounded edges frame}

I love that on each thing you can customize it.  Like taking off the film strips or adjusting how rounded you want your corners.  I think this one is my favorite.  Hence the Facebook profile picture!

{cross-processing, faded just a bit + rounded corners}

Cross-processing is by FAR my favorite.  It gives that vintage-y summer feel that I love.  I almost always fade it to about 45 percent.  

{collage}

The only time I really want to upgrade to Premium (its free unless you want more stuff) is really when I try the collages because they have way more layouts in premium.  But I'm cheap and these work!  You can change the color, spacing, sizing and all that.  Much easier than trying to figure all of that out in Photoshop!

 {polaroid frame + text}

These polaroid frames are fun and always make me think of Jim and Pam's wedding on the Office when they pretend to capture moments with a camera. Little side note- I sure hope the Office is a little bit better this season.  Is it just me or did it lag just a bit this past year?

{black frame + exposure}
Sorry,back on track :).  You can also do basic editing like fill light.  You save them right to your computer and all of the sudden you are a pro photo editor!

 {before and after + rotate + '60's}
Here you get the whole picture.  The photo on the left is the original and the right is rotated and has a '60's effect on it.  Pretty cool huh?!  It was really fun getting all dolled up and getting my pictures taken.  I was inspired by my friend Stacy and her beauty shots she got a couple of weeks ago.  Hope you enjoyed the photos!  Now go mess around with Picnik!

{FULL DISCLAIMER}
You have to have good photos to begin with!  Thanks Darin, for making me look so beautiful.  I heart you too ;)
Photobucket

LinkWithin

Related Posts with Thumbnails