Wednesday, March 31, 2010

Scrappy Camera Strap


I used up some of my scraps from this scarf to make a new camera strap last weekend.  Nothing too exciting but I love the colors and it was an awesome scrap buster!   I almost threw my sewing machine out the window on Saturday, trying to make it.  But I persevered and it looks cute around my neck.  Almost makes me want to take up photography.  (I think I said that about my last camera strap, so don't hold me to it.)
And by the way, sewing machines do collect dust and lint so its good to clean it out every once in awhile.  Probably more often than once every seven years. You and your sewing machine will have a much better relationship.
Photobucket

Tuesday, March 30, 2010

For My Peeps

Ivy and I made this fun little treat for the kids in her preschool class.  You can get the free download 
HERE .  
One row of peeps fits perfect in those small snack bags.  Just staple it on and you've got a sweet treat for all your peeps!

Want some peeps without the calories?  Check out this super cute Peeps Bunting!
You should make one. And one for me!
Photobucket

Friday, March 26, 2010

Fabric Rings

Last Friday morning I was rushing around trying to get all packed by 11:15.  Darin's sister was going to show up and we were headed out to Idaho.  Well you know how it goes.  We didn't end up leaving until about 1pm.  Since I was all packed I had a few minutes to spare so I made some rings!
 I got these ring blanks at Michaels a couple of months ago on clearance.  My metal glue was dried up so I had to use hot glue.  First up was a large scrapbooking brad.
Since hot glue doesn't work too well with metal and metal I cut  a small felt square and poked the brad through.  Then I folded up the prongs so they didn't show.
I  hotglued it to the ring blank and that was it.  Easy peasy.  Well that took about 2 minutes so I made some more!
The middle one is a singed flower.  I used black satin and 3 small black beads.  This one took a couple minutes longer but not much.
I also did some large covered buttons.    Ta da!  Four rings in about 10 minutes isn't too bad.  And for seriously like 50 cents each you can't go wrong!

Photobucket

Thursday, March 25, 2010

Lush Spring Wreath

Whew!  What a week.  I'm glad to be home, even though we had a fun time in Idaho. Darin's grandpa passed away last week and we headed to Idaho Falls for the funeral.  He was almost 92 so although a bit of a surprise, not totally unexpected.  It was fun to see all of the Warnick cousins and see family was the bonus of the trip.  But it always takes a couple of days to recover after traveling with a 2 year old.  So now I'm back and ready to finish up those projects I was going to do last week.  

My Minds Eye has done it again with their Lush line.  I love all of the colors and that they have houndstooth!
And the colors just scream spring.  Although as my mom said I never thought I would see the day there was pink decorations in my house but here goes...


I started with seven pieces of paper that were about 9 inches x 12 inches and accordian folded them all.


Then I got them in the order I wanted and attached them together with double sided tape...


then the two ends to make a circle.  


I  hot glued a square of cardboard to stabilize it in the middle.  I forgot to take a picture (I do that a lot)  but I poked a hole in the middle of the cardboard and threaded a 3x44 inch piece of white fabric through to hang it with.


Then I glued on a doily and made a coffee filter pom pom to put in the center.


Then I hung it from a mirror!  It has my 3 favorite patterns-polka dots, houndstooth and damask.  I'm having trouble not being drawn to damask can you tell?!


Except now my mom has me rethinking all of this pink!  Can I handle it?  Can Darin?!  We'll see...

giveaways
Photobucket

Friday, March 19, 2010

Not getting much done

I had big plans for this weekend.  Start on some easter sewing, work on decorating my house for spring and make some fun stuff.  Then we were going to leave Saturday night and head to Portland for NW Market-a shoe and accessories trade show.  Every girls dream right? But none of that is going to happen.  Ivy has been so sick that past couple days (luckily she is feeling better this morning).  Darin has been sick for 3 weeks and finally went to the doctor yesterday and found out he has pneumonia.  We also had a death in the family which means instead of going to Portland we are heading back to winter weather in Idaho for a funeral.  
Ok.  I'm not whining complaining ok just a little but oh man.  So I thought I would give you some ideas of stuff YOU should make this weekend.  
 These button covered rings at Smashed Peas and Carrots
or maybe try...
some of these necklaces fromTator Tots an Jello!  
And since its definitely spring here in the Tri Cities and its going to be flip flop weather soon I highly recommend...
Some interchangeable flip flops at Make It and Love It.  

So maybe this is a little reminder list of stuff I want to make or was going to make this weekend.  I've got to get packing and pull out some of our winter clothes again! Enjoy the sunshine and thanks again Kristin!
Photobucket

Wednesday, March 17, 2010

Bling On My Chandelier

Can I just say that I love having a vinyl cutter?!  I love how quickly I can come up with something so cute.  
I had a 12 X 12 canvas hidden in my craft room.  And when I recently did a major clean out I found it and it didn't take me very long to come up with what I wanted to do with it.  
I started out and painted it a really pretty Spa Blue color.  I know it doesn't look super awesome but I could not for the life of me get my camera to take a good picture of the blue.  Or the camera couldn't get me to take a good picture of it.  However you want to look at it.  I only did one coat so the white could show through a bit and not look so perfectly painted.
 I had found a chandelier doodlebat that I liked and didn't look too crazy to weed so I cut it out of flat black vinyl.  I took the sandpaper to it to give it a antiqued look a little bit.
After I put the chandelier on the dry canvas I added some bling!  I had picked up some multi-sized crystals in some dollar spot somewhere (I think it was JoAnn's).  I put the crystals on each black circle in the various sizes.  They matched up perfectly which made me happy.
 I added it to my mantle because it was in some serious need of color.  Ignore that the jar of Cadbury eggs is only half full.  I keep snatching them every once in awhile and I can't find any more ANYWHERE to fill it back up!  I'd show you the rest of my mantle except it needs some serious work. This is a good start though!  And just so you know I took this picture at 6pm. I love daylight savings time! And I got a sunburn at the park yesterday.  Yay for spring!
Photobucket

Tuesday, March 16, 2010

I Pod Case (tutorial I tried)

I want to try something kind of new and do a Tutorial I Tried feature every week.  Sometimes I look at a tutorial and wonder if it really is easy or what someone else thinks so I thought I would kind of do a review type thing.  
First up?!
Here's how mine turned out.  The only thing I did different really was added a button and button hole to keep it closed.  I pieced together some scraps for the outside and used the polka dot for the lining.  
I think the best kind of easy tutorial is one that uses stuff that I already have.  If I have to go to the store to buy something than chances are it will take me a while or won't get done.  Because by the time I go and get the stuff, I've probably got something else I want to make!  
I like the case because it will protect that already scratched up screen on my i pod when I throw it in my bag.  I loved this, but will probably need to make some adjustments for our little camera( I think its too big).  The case took me about 15 minutes to make, after I picked out which fabric I wanted to use which always takes me FOREVER.  Super fast, and super easy.  And it is pretty cute if I do say so myself. ;)
Photobucket

Friday, March 12, 2010

Howdy Partner

Darin had the opportunity to take some photos at this really cool old silo here in West Pasco.  It was dark so it was kind of hard to focus the camera but we got  a couple good family shots.  
It worked out perfect since I just finished making Ivy a new dress!  And it ended up having a bit of country feel to it.  I used the same pattern as this dress (the perfect party dress from Heidi and Finn on Etsy) and added a few things.  
My sweet baby girl has really long legs.  So I used the size 2T from the pattern but with the length of the 3T and I added a four inch ruffle at the bottom.  
I also added a little apron that has a couple of messy flowers in the corner.  Add in a polka dot flower hair clip and you've got a cute little cowboy.  Oh wait.  We are still working on the fact that she is a cowgirl and not a cowboy!
Photobucket

Thursday, March 11, 2010

Women Who Create Books

Here is my Women Who Create book I got from the Relief Society dinner.  This was the best part (and most time consuming and rewarding) part of the evening.  We started three months ago and divided up the list of sisters among our "enrichment" committee.  We were to come up with five attributes about each person.  Now this was no small task since there are almost 150 sisters in our ward!  We had the list on a Google Document so we could all edit it at any time and then went to work.  It was so rewarding to find out who each person was (since I didn't know very many to start with) and the things that people thought was special about them.  This cute girl kept us on track and with a couple of days to spare we did it!  I hope everyone loved it because as much as it was hard work we loved doing it.   
So here's how we put our books together!
As soon as I saw this post on the House of 3 blog I knew that is what I was going for.  So I got the Monogram kit.  But I wasn't quite sure on a background. 
Our  sweet Celia made this amazing poster for advertizing. Didn't she do an amazing job? Those words in the back ground are from the "Happiness, Our Heritage" talk.    I had her send me the file of just the background and put it into Adobe Fireworks.  From there I made a sheet with 4 of each letter on it.  (Sorry no pictures of this process)  Then I counted how many of each letter we needed and printed them out.
 Here is just a sampling of all of the different letters.  I loved how each one is different.
Behind the cover we had this quote from President Uchtdorfs talk.
"Don’t let fear of failure discourage you. Don’t let the voice of critics paralyze you—whether that voice comes from the outside or the inside. You are a great power for good. You will make the world a better place. Lift up your chin; walk tall. God loves you."
D.F. Uchtdorf
The third page was the attributes page.  I know its blurry but its all I have to show you!
And after those pages were 4 blank pages for other people to write on.  The idea was to go around and write in others' books about what you admire about them.  
I'm so glad that everything worked out and we were able to have such a special evening.  And just like I promised HERE is the recipe for Lindsay's Asian Wonton Salad! 
Oh yeah and then to put the book together punch two holes in the top and tie with a strip of tulle!
Photobucket

Wednesday, March 10, 2010

Women Who Create and a Lolly Tutorial

Last Thursday we had our Relief Society Birthday Dinner.  The theme was "Women Who Create" inspired by the talk Happiness, Your Heritage by President Dieter F. Uchtdorf ( of the LDS Church).  We had a fabulous dinner-chicken and wonton salad with ricin the gym and then moved to the RS room for 3 speakers based on President Uchtdorf's talk and then back to the gym for icecream sundaes with chocolate dipped fortune cookies.  Unfortunately I didn't get any pictures of the yummy food-I forgot my camera for the actual night- but Lindsay and Mandy did a awesome job!  I was in charge of decorations which I love and always make too big of a deal out of, but thats what makes things special right?
If you've ever decorated an LDS gym you know it can be a challenge.  They are quite large and you just can't get around the basketball hoops.  We kept to one side of the gym and used the rolling chalkboards to cut it off.  (Same idea as from the valentines dance)  I hung these tissue pompoms from the basketball hoop at varying heights.  These are my fave or decorating since they are so cheap and easy.  
I made some garlands from doilies and ribbon, just fold the doily in half and staple over some ribbon (I used gift wrapping ribbon spools).  I saw this at a  boutique in Utah and fell in love.
I also did some coffee filter garlands.  I love how fun and inexpensive these are.  Right now these are hanging in Ivy's room!
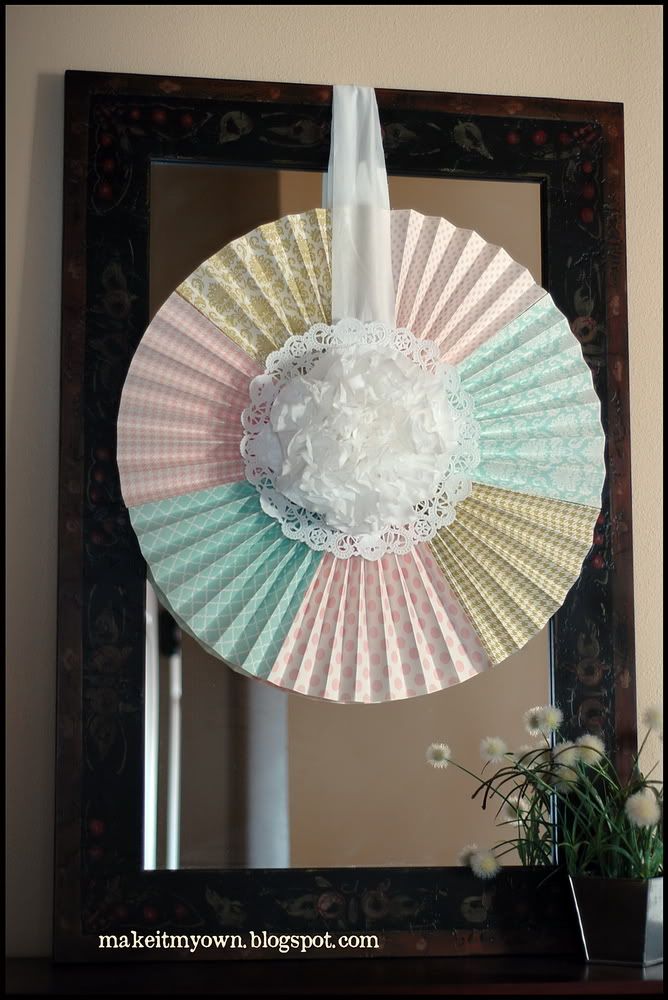
Originally we were going to have our dinner in the multi-purpose room so I was going to hang garland for the ceiling and have small centerpieces.  Then we realized almost 70 people would be coming (We sent out an Evite) and moved it to the gym.  So I needed a bigger centerpiece.  Don't you love when you get an excuse to make something?!  I had been eying these lollies on the House of 3 blog and now had the perfect reason to make some, or 30.  So now here's your tutorial!  (Sorry there are a lot of pictures but I'm kind of visual that way and something gives me the feeling you are too!)
Supplies
~ an old book you don't mind ripping up
(I got mine from Goodwill for 70 cents.  I think the pages are about 7 1/2 by 5?)
~six inch doilies
~embellishment (I'm using feathers and scraps of paper)
~hot glue
~ a circle punch or something circular to trace
~dowels
~ribbon
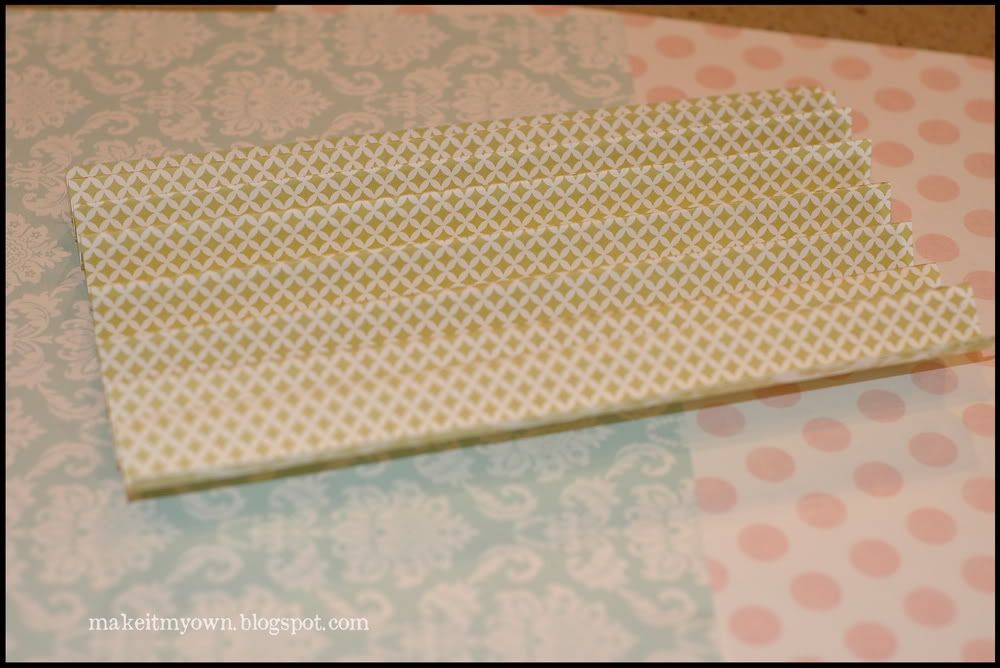
First up fold your pages accordian style (you need 3 pages per lolly)
Then fold that in half
Do this for all three pages
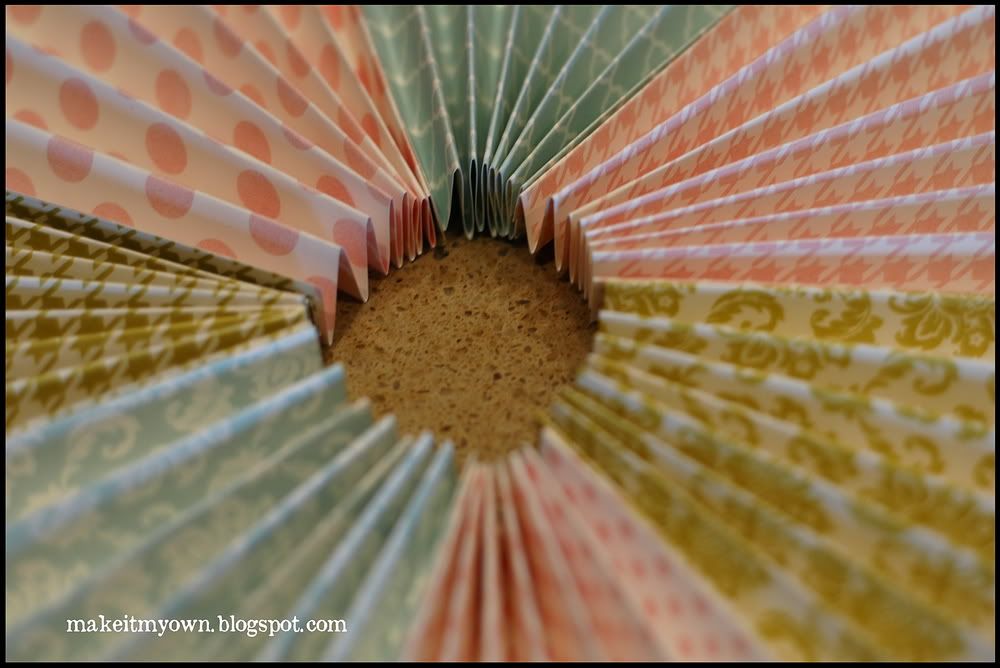
You are going to put a strip of glue on one side and then pinch it together so it stays in a fan shape,
like this!  Again do this for all three pages.
Pinch the fan together and put a line of hot glue on one edge.  Glue it to another fan, and another,
 so all three are glued together like that.  Put glue on one outside edge and open up your fans so you can
glue it together like this.  I hope this is making sense so far.   Cuz that was the time consuming part especially if you make 30 of them! (Thanks Celia for doing half)
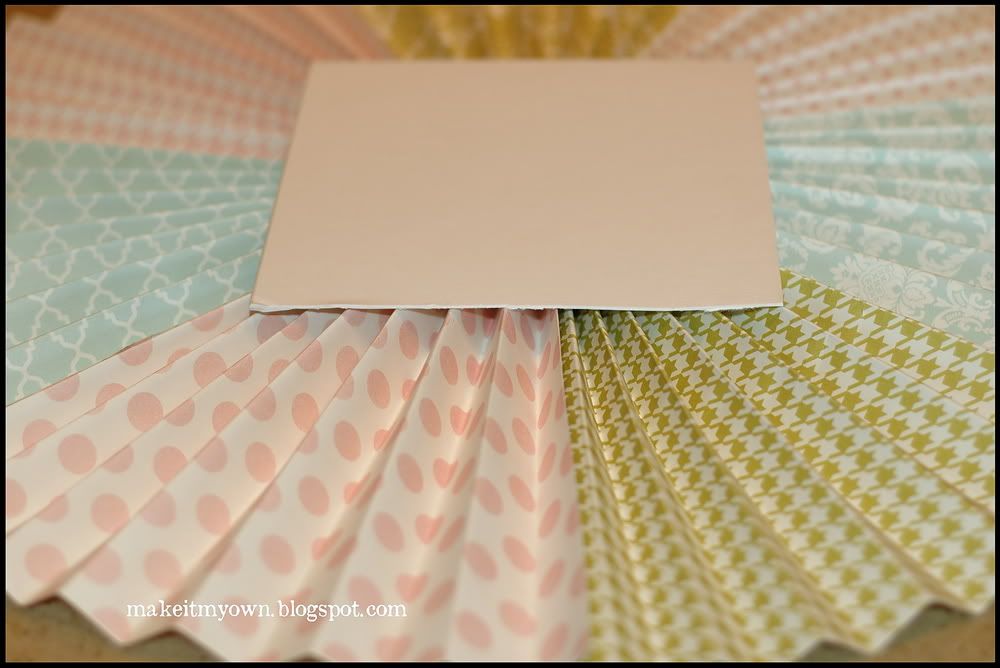
Now put some glue on the center of your doily and center you book pages on it.
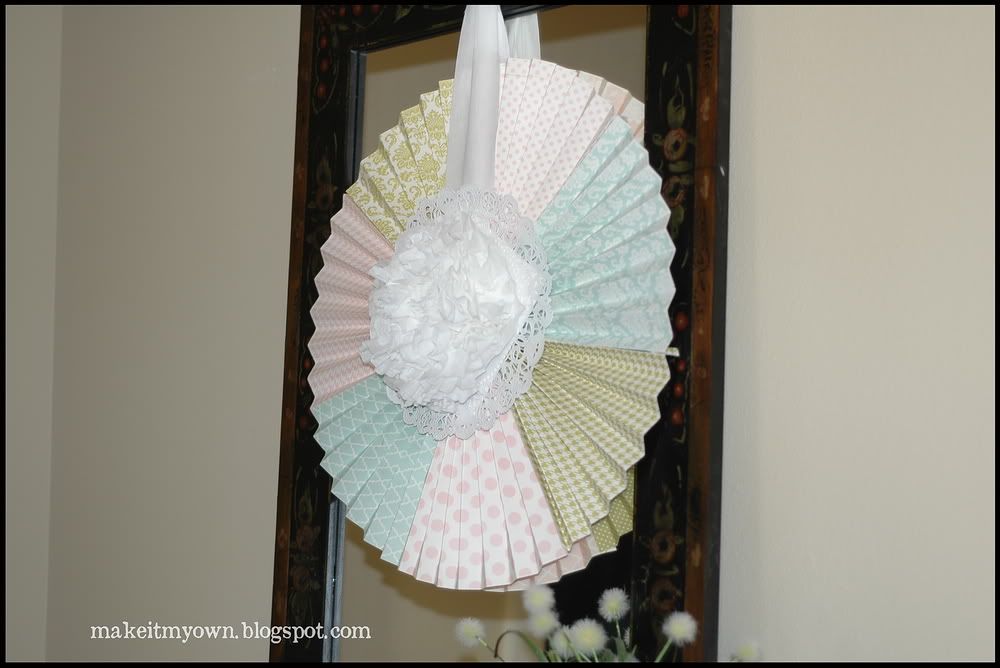
For my embellishment I used some feather trim.  This is where you can get all kinds of creative, but here's mine.  I glued on some feathers,
then I traced some circles ( maybe an 1 1/2 inches?) cut them out and distressed the edges.
And you guessed it I hot glued it onto the feathers.  Ta Da!
I used 3 different papers and put three in each vase.
Sugar is a great vase filler cuz it is so cheap and if your vases are clean you get to just put it in your pantry instead of taking up precious space in your craft room.  I tied on some pink ribbon to the dowels.  You could paint them but I didn't want to ran out of time.
Oh and those lollies just slide on to the dowel behind a fold so you can switch them out and store them easily! 
Tomorrow I'll share the best part of our evening and how we celebrated the women in our ward.
  (since this was way long!)
I'll also try to get the Wonton Salad recipe since it was SO yummy.

Linked up at 
Blue Cricket Design
and
giveaways 
Photobucket

LinkWithin

Related Posts with Thumbnails