Showing posts with label photoshop. Show all posts

Wednesday, November 6, 2013

Giving Thanks to you.


Normally in November I do a daily thankful.  I've missed it a little bit this year but I think saying I'm grateful for Axel every day might get a little repetitive.   And while I have so many things to be thankful for, he is always the first thing that pops in to my head.  When I look back over the past few years and think about where my heart was when I started an I'm Thankful month it kind of seems like a lifetime ago, and a different me.  I feel like I am whole these days.  I feel happy and amazed that I feel happy.   Its good.  So this month I'm giving thanks.  To my friends and my family.  To everyone who has been a part of this story.  I couldn't have done it without you.  

: rustic graphics via 
Photobucket

Monday, December 10, 2012

A cup of cheer | Printable


Ask and ye shall receive!  I've uploaded the cup of cheer pdf to google docs for you to download!  It is a PDF that you can print on cardstock and use for gift giving this year.  {Personal Use Only}


I printed mine on white cardstock and then rubbed chalk on them to give a more authentic chalkboard look to them.  I also like to rub some black ink on any cut sides so the white edge doesn't show.  

Uuummmmm.... I feel weird about this and I don't quite know how to ask.  But we are friends right? 

I love being a stay at home mom to Ivy.  I love making things and sharing it with  you guys.  I also really want to adopt a baby.  Which it turns out can be kind of expensive. And it can be hard as a SAHM to come up with ways to help out with extra expenses sometimes ya know? So I thought I would try and use my resources.  If you love a free printable that I share, and want to download it to use, would you maybe donate $1 to our adoption fund?  Its done through paypal so its super easy and only takes a second.   Just click the donate button under the printable, or on my sidebar over there.   Of course you don't have to.  NO PRESSURE!!  You can totally download them for free and I'll be so happy that you loved it enough to use it and spread some holiday cheer! Mmk thanks. End awkwardness. 


  I hope you guys had a great weekend!  Ivy and I got invited to attend the Nutcracker on Saturday.  It was a first for both of us.  I know, how did I get to be 33 and never have gone?  Well we loved it, especially my little ballerina.  We got all dolled up.  Ivy even wanted her hair curled.  Which is a really big deal by the way.  


She added my leopard scarf to her ensemble.  Besides the whole socks and sandals thing, she can be a regular fashionista.  But holy cow isn't she gorgeous.  I love her to the ends of the earth.  Even when she makes me be the nutcracker or the rat king ALL day long.  She has been a dancer/ director/ stage hand/ costume designer almost nonstop since Saturday night.  The creative energy never ends with that girl.  

Happy Monday!

Photobucket

Friday, December 7, 2012

A major award!


This morning my instagram notifications were going crazy!  That's weird I thought, since I didn't take a single picture yesterday.  Fail.  But oh man I was so excited to see why!  


Eek  I won!  Rhonna Designs picked me!  Woot.  Darin is so proud  :)  Thanks to Rhonna and all of her cReative team for your amazing inspiration.  And of course I'd like to take a moment to thank InstaChristmas, which has made all of my holiday dreams come true ;) Cup of Cheer!  Cup of Cheer! Oh man, I need to lay off the Christmas movies.  Doesn't that sound like the Chair of Cheer from the Grinch?  I hope you guys are having a good Friday! 

PS watch Instagram this weekend for more InstaChristmas sneak peaks!
Photobucket

Thursday, December 6, 2012

Santa's Little Helper Service Project


At church I got a new calling working with the 10 and 11 year old girls.  I love it!!  These girls are so much fun.  My only challenge really is that there are 20 of them!  It is hard to find things to do with them that we can get done in an hour.  We kind of have to keep it simple.  So this week I decided to turn them all in to Santa's little helpers.  

I saw the idea on The Fickle Pickle and switched it up a little bit to go with the holiday, since its December and all.  I found some $1 Santa hats at Walmart, grabbed a couple of boxes of candy canes and put my own elves to work putting together 20 Mission Possible packets.  I used the the printables from The Fickle Pickle's original post which are super awesome!  She even has a list of service activities to do.   Because of the Santa hats I went ahead and used 9x12 manila envelopes.  I put together a subway art tag for the front and was done.  For the subway art I used a couple of lines about elves from Christmas movies that were in my head.    We have been watching the Santa Clause kind of a lot so thats where a couple come from.

The girls loved it and it was fun to hear them get excited about all the different things they could do for others.  They make awesome elves!

Photobucket

Tuesday, December 4, 2012

Have a cup of cheer.


Have you been loving all the chalk art that has been popping up?  Just when you thought the chalkboard was done, too.   I was patiently awaiting Rhonna Designs to release her InstaChristmas because I knew it would be perfect for adding some chalk art to my home for the holidays.   In fact the only thing I bought on Black Friday was InstaChristmas.  Well besides a trip to Voodoo Donuts I guess ;)  I have been adding it to my instagram photos and playing around with it in photoshop as well.  I really, really, totoally like it. 


Over at Rhonna's blog she is having a tag contest so I came up with a little gift tag that can be used lots of ways for gift giving this holiday.  Using a chalkboard background in photoshop I came up with this little guy.  Ivy has been walking around singing this song and I couldn't get it out of my head!

I made a fill page for the back side and was able to fit 9 of the 2.5x3.5 tags on a sheet of paper.  I printed it out on white cardstock and cut out each tag.  To give it a little bit more chalkiness I rubbed chalk over the whole design and then wiped it off.  Use a black ink pad to ink the cut edges for extra measure too.  


I think it would be a fun hostess gift to tie a tag on to a bottle of sparkling cider.  And even more fun would be to get those mini bottles and have them for New Years Eve!  Oh, man.  How cute would that be?!  

I've been wanting to try the sharpie mug thing so I decided to actually make a cup of cheer.  I got a mug from Target for $3 I think, and using a circle stencil and a bronze sharpie I put some confetti dots all over the mug. 


 While my mug was baking {at 350 for 30 minutes}  I made a pocket for a packet of hot chocolate.  I printed out the chevron fill page on kraft cardstock and then cut a library pocket like the ones I used for my advent with my silhouette.   I love seeing the design peeking out from the inside.  I backed my tag with some red striped paper and glued it to the front.  I tucked the hot chocolate, along with a mug rug and a box of chocolates into my fun new mug to give as a gift to add some cheer to a dear friend's day.  

I might even make up a couple more of these library pockets to stick some Starbucks gift cards in for quick gifts to give to friends and teachers.  So many ideas for one little tag!

EDIT!!
You can now download your own Cup of Cheer tags by following the link below.  And read about how you can maybe help with our adoption HERE


PS you can check out the other instachristmas tags too!
For Your Mistletoes
Rock the Night Away
Photobucket

Friday, October 12, 2012

Halloween Subway Art. Printable


If you follow me on Instagram you've seen that I have been working on a holiday planner.  I'm moving on to Christmas now that I finally did my Halloween title page.  My goal is to have it done and ready to bind by Monday.  Yeah....Wish me luck on that one.  

I made a small subway art that I printed on to kraft paper but I've made it a bit bigger and uploaded it to Scribd as a PDF if you want to print one out.  It is sized as an 8.5x11 to print, but the words fit in a 8x10 frame.  You will just need to trim the edges if you want to do that.  I used some of my favorite fonts like Bebas and Blackout along with a couple others.    I also had a mini treat yo'self moment {I can not be held responsible for things I do while taking nyquil} and got the Insta Patterns kit from Rhonna Farrer.  It's been on my wish list for awhile.   That is where the chevron and dots come from.  Pompadour is the font I used for the numbers.


Get your halloween subway art to print HERE.  I Hope you have a fallish, halloweenish weekend!

Photobucket

Thursday, April 19, 2012

The Friendship Bracelet Kit {with free download}


I have 8 nieces and they almost all have birthdays in the spring.  The younger girls were easy to get gifts for but the older ones needed something pretty cool.  Cuz I gotta be the cool aunty ;)  So I put together some friendship bracelet kits to keep them busy this summer!
They are quick and easy to put together.  You just need to head to the craft store armed with coupons and they are pretty cheap too. 

Since I made multiple kits I started with a huge value pack of embroidery floss that was about $10 on sale.  The pack had 150 flosses in it and I was able to make 5 kits.  I also got these awesome floss organizers that, after using a coupon were $2 each.  


I created a tag in photoshop {which you can download it at the end of this post!} and attached it to the lid with double sided tape.  I also added a bracelet that I made just for fun.  


I found clipboards at that one big huge store I don't like that has a ruler on each side which I thought would be perfect for measuring out floss and knowing how long to make each bracelet. I got it all tied up with some yarn and its ready to give to my nieces!

I've uploaded some tags if you want to print out for your own friendship bracelet kits.   Just click on the link under whichever one you want to download.    

Wouldn't these be awesome for road trips this summer?!


font: blackout
arrows: courtesy of Amy Morby
Photobucket

Wednesday, January 4, 2012

Inspire Me. Fonts


Hello!  How was your holiday?!  I hope it was magical.  We are just getting back in to the swing of things after being on vacation for a week and a half.  Which mostly means I have tons of laundry to do.  I really need to tackle that but instead I'm searching for fonts.  Apparently a girl can't have too many.  If you are looking for some new ones here are some I've downloaded in the past few weeks either from Font Squirrel or Lost Type Co Op.  


{p.s.  Yes, Sophia is Sofia}
Photobucket

Wednesday, December 14, 2011

Photoshop Tutorial | Using FILL to make your own patterned paper


The other day I gave you a gift tag download I made using colourlovers.  Colourlovers is a rad website where you can make your own palettes of colors and you can use all of the designs, color them and come up with some fun patterns.  You can then use the patterns in Photoshop to make your own printable paper.  

So hurry and sign up  for colourlovers so I can walk you through how to make a fill in photoshop. Then you can make all sorts of fun paper for Christmas tags or just about anything else.


Lets start with this polka dot pattern.  Once you have found the pattern you like * don't worry I will wait * you can then change the colors from grayscale by clicking on each color box and finding the colors you want.

{Its a little detailed so click through to get the full tutorial} 

Tuesday, December 13, 2011

Making your packages Merry & Bright {download}


One of the best parts of all of the treat and gift giving this time of year is the packaging.  Don't you agree? I've been heading to the post office just about every other day with happy mail I have been sending for Ruffled Sunshine and gifts I've been giving.  Luckily I have a post office just down the road in the grocery store so I can skip the lines!

If you would like to make someone's day Merry and Bright, get the tag printables by clicking through...

Friday, January 14, 2011

Subway Art {free printable} and a winner!

First things first!  
The winner of Celeste's CORE 4 ab program is {according to R.N.G}...


#21


LOVELY LINDSAY!  


Seriously.  The stars are aligned {even if the earth is wobbly and we all have new astrological signs}.  My friend Lindsay is a new Mama and Random Number Generator couldn't have picked a sweeter girl.


Oh, Lindsay I'm so jealous of you!  Congratulations!  I'll be putting you in contact with Celeste to claim your prize.


{Thanks everyone for entering.  As a side note, if you want to enter giveaways, would you pretty please enable your email address on your blogger profile, or add your email in your comment?! It makes getting in touch with you so much easier.  Thanks so much!}


And another side note, is it really true that we have new astrological signs?  Because apparently I am now a Virgo and a Libra:  Virgo ends on my birthday and Libra starts on my birthday.  What the heck.
+++


I've been cheating on Picnik.  Shhh, don't tell, but sometimes a girl just wants a little bit...more.  Photoshop and I have just been friends for awhile but over the past couple of months it has developed into more than just friends.  We definitely have our fights but in the end we manage to patch things up.  Oh, I still heart picnik don't worry, I just am loving all of the things I've been mastering in Photoshop.  Ok, not mastering, but definitely getting better at.


Subway art is kind of everywhere right now, and it has been perfect for hanging out with my new love.    I made this one to show you my favorite fonts these days.  All of them can be found for free at Dafont except the ld adornment, which is from scrapnfonts. 


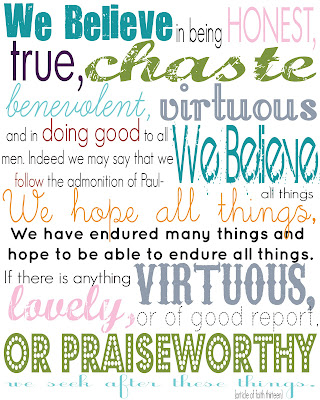
I mentioned the other day that I've been working in Young Womens for a couple of months now.  Every year my church picks a new theme for the youth.  This year is the thirteenth article of faith.  So I made this subway art for our girls.  I printed it out at Costco as a 20x30 and headed to Hobby Lobby.  My original plan was to Mod Podge it on a canvas, but I found a 20x30 piece of foam core that was sticky backed.  I think a ray of sunlight broke through the clouds when I found it.  It seriously only took 1 minute to put my print on and it looks awesome!   According to my girl Carra it is "epic"!  

I've gone ahead and uploaded it as an 8x10 so if you right click and save it you should be able to print it out for anyone you know that would need an "epic" print of the thirteenth article of faith.  A few of you asked about my BE one too.  So here's the 8x10 of that also.


{I hope it works.  Let me know if you have issues.}


Have a fab weekend! 

Photobucket

LinkWithin

Related Posts with Thumbnails