Showing posts with label vinyl. Show all posts

Thursday, December 1, 2011

A Little Service. Advent

Can it really be December already?  I love December, don't you?  I've had advent calendars on my mind since I've been putting one for our family together.  It just needs to be hung and I can't wait to show you.   Until then I wanted to share this little service advent calendar we made with our Young Women at church last night.  


On our schedule was a service activity.  But we also wanted to  help them have service on their minds for longer than one night, especially during the holidays.  So I came up with an easy way for them {and I} to perform service all month long, keeping Christ more centered in our Christmas.  

It is simple to put together and  if you want to make one for yourself, I bet you could even get it done today and not miss out on a day.

I found the envelopes in the gift bag section at Michaels.  I think they were $3 for 25.  I cut numbers with my Silhouette but you could use stamps or any number stickers you have on hand.  Hole punch the top and string them all together.  Tuck in a card with an act of service to do each day, and you are ready to count down the days to Christmas!  

+++

PS... The winner of the Level Up Intro To Photography class is Italia!  Thanks so much for entering!  And I'll let you know when the class after Christmas is so you can learn how to use your new Christmas Presents!


Photobucket

Wednesday, January 26, 2011

Glitter Hearts make me happy.

How do you like my newish digs {again}?  I can't help it.  I just have too much fun, trying out new stuff and the holidays just need to be decorated!  I've got a little valentine project to share, but I wanted to point out a couple of things real quick.  I've been cleaning things up and working on adding pages, so those big words over there will take you to things like how to get a hold of me, my shop, blogs I like to look at... stuff like that.


I also had a moment of crazy the other day and signed up for twitter.  I have no idea what I'm doing on there, but I would love for you to come and follow along with me, and I'll follow you too!  My handle{?} is @ruffledsunshine. Do you say handle in the twitter world?! See. Crazy.  I need twitter lessons.

+++
I'm slowly learning that Valentines Day is a holiday you have to get a jump on.  If you don't it sneaks up on you and then you are scrambling.  I got a little push the other day when I got to help style a  Valentines photo shoot.  I can't wait to show you how it turned out.  It was kind of really amazing. 

{oooh,  a sneak peak ; P }
 
Since there has been very little crafting going on here at this blog I thought i would share one of the little things I came up with. 
 Ready to get your heart on?

At Christmas we got a slice of a tree from Darin's Grandpa.  I got to brand it and everything.  It was all very exciting.  And now its perfect for the photoshoot.
  

I cut a heart out of vinyl on my Silhouette.  I didn't use the heart though, I used the negative space as a stencil.  Vinyl is awesome that way.  I love it when things pull double duty.  


Place your stencil on your wood, or whatever you are stenciling. Make sure and seal the edges really well, especially if you are using paint.  

I've been feeling all of the sparkly stuff lately so I went for mod podge and glitter on this one.  Paint your mod podge on pretty thick then dump on some glitter.  Joann's has started having some holiday colors of glitter in their dollar section.  I love it because I don't have to try so hard to save every speck of my $5 glitter.  Once it has dried a bit dump off your excess glitter and then mod podge OVER your glitter.  I know it looks scary but it does dry clear.  I promise.


After it dries, take off your stencil and you're done!  Its a simple project, but I love how the glitter and wood go together.  Two things that aren't necessarily supposed to be together, but get along so fabulously. 


XOXO.

See glitter hearts make you happy too.
Photobucket

Monday, August 9, 2010

Photo Props

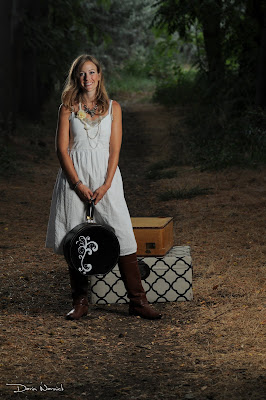
When I was in Portland a couple of weeks ago my sister and I hit up the thrift stores for some photo props for Darin.  I wish I had remembered my camera because these places were incredible.  We hit the jackpot at Rerun in NE Portland off of Fremont.  Everywhere else was a little spendy, but we scored a couple of chairs, a trunk, some suitcases and a couple of odds and ends.  
  Here is a stack of luggage that we thought was cute all together.  The white trunk is wood and is blue inside and has some chinese tag inside.  The yellow has an amazing green lining that is in super good shape.  And the black hat box was just too rad to pass up.  Wait until you see the lining!
Isn't it fabulous?!  Well as awesome as our finds were I wanted to spruce them up just a bit.  I used some vinyl and I guess I was too focused trying to get it done because I forgot to take pictures of the process.  But here is how they turned out...
I LOVE how the trunk turned out.  I had been waiting for just the right project to use Jen's Quatrafoil at Tatertots and Jello.  The best part about her download is it is a PNG and it is tile-able.  Which means it repeats when put together.  
Pretty cool huh.  And she was so nice to share!
 I added a swirl to the hat box using the letter "Z" from DB Fright Night.
Kind of fun huh?  I'm thinking I just need to use it for my luggage all the time.  Or stack them up for an end table with a lamp.  Of course all photos were courtesy of Darin. I'll show you the rest of the pictures from our photoshoot tomorrow.  I know you are just on pins and needles!
Photobucket

Thursday, June 17, 2010

S'mores

I LOVE perfectly toasted marshmallows.  I have even been known to toast them inside over the burner.  I seriously consider throwing them in the fire if they get scorched though.
I could actually do without the whole s'more part of it.  I'm content to just eat all of those golden brown marshmallows. 
I got some chalkboard vinyl this last week and here's my first project with it!
  My sister in law LoLo had her birthday and she shares my love of that tasty campfire treat so I whipped up a basket for her new backyard and firepit.  I got the bucket at Target and put in all the makings for S'mores.  I also threw in a couple boxes of chalk so that she can always change it with the contents of her cute bucket! 
image via country living

Aren't there too many great parts about summer?!.  My other sister in law has roasting marshmallows down to a science where she toast it, then eats the outside, toasts it again and then eats it.  So tell me, do you like your marshmallows golden brown or burnt to a crisp?!  Any other favorite toasty treats?  I have been wanting to try the starburst thing but haven't ever done it.  I think I better go check our marshmallow stock!

Photobucket

Thursday, April 1, 2010

{SIGH}

I've got the decorating bug.  But we are renting a house so there isn't much I can do about that.  No painting, or vinyl on the walls.  {SIGH}.  So I thought I would show you some stuff that we did in our house in Denver! If we could have picked up that house and brought it with us I would have done it in a second.  We built it and I thought it was where we were going to stay for a LONG time.   
First up a taste of Ivy's room.  That grass went all around the bottom.  It was just about 24 inches tall.  The ladybugs were 2 layers of stickers.  The was also some ants and butterflies and flowers.  If I remember right the tree was almost as tall as me so 5 1/2 feet tall.  Isn't that little owl so cute!
 
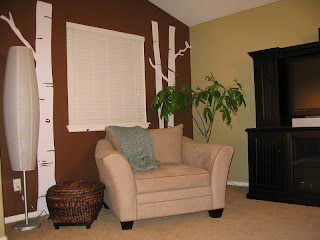
The master bedroom was the one of the best parts about the house.  It was big and had a bit of breathing space.    In this little recessed area we painted a brown accent wall and added some vinyl aspens.  Can you see that little bird in the corner?  I don't know why but I loved how his tail just barely went on the other wall.  
 
There was also a pop out on this wall  that we painted the same brown and added a branch and bird.  That green is my favorite paint color.  It is Moselle green by Kwal Paint.  It is the perfect neutral green.  If you are wanting a green its the way to go. 
Going up the stairs was this huge wall that we did a photo grouping on with some more vinyl above it.  The best way to do a big photo grouping is like this.  It works like a charm.  
This was the best part about our house.  It was SO open.  I love having big windows and tons of natural light.  That's something I love about springtime is wanting to open up the blinds first thing in the morning and letting in that gorgeous sunshine. Man that house looks clean. Oh wait, it was!  We didn't have a 2 year old leaving a wake of toys and crumbs everywhere!

{edited to add}Whew.  I feel better.  Sometimes I get sad about the things we left behind in Denver.  But doing this post reminded me that things like this house really are just things.  My home is always where my family is and not being able to paint the walls doesn't make it less of a home.  Besides there are so many little things I can do to make it my own, that I can take with me.  Like the pillows I want to make this week, or the lampshade redo I have in mind, or this or that....;)
Photobucket

Wednesday, March 17, 2010

Bling On My Chandelier

Can I just say that I love having a vinyl cutter?!  I love how quickly I can come up with something so cute.  
I had a 12 X 12 canvas hidden in my craft room.  And when I recently did a major clean out I found it and it didn't take me very long to come up with what I wanted to do with it.  
I started out and painted it a really pretty Spa Blue color.  I know it doesn't look super awesome but I could not for the life of me get my camera to take a good picture of the blue.  Or the camera couldn't get me to take a good picture of it.  However you want to look at it.  I only did one coat so the white could show through a bit and not look so perfectly painted.
 I had found a chandelier doodlebat that I liked and didn't look too crazy to weed so I cut it out of flat black vinyl.  I took the sandpaper to it to give it a antiqued look a little bit.
After I put the chandelier on the dry canvas I added some bling!  I had picked up some multi-sized crystals in some dollar spot somewhere (I think it was JoAnn's).  I put the crystals on each black circle in the various sizes.  They matched up perfectly which made me happy.
 I added it to my mantle because it was in some serious need of color.  Ignore that the jar of Cadbury eggs is only half full.  I keep snatching them every once in awhile and I can't find any more ANYWHERE to fill it back up!  I'd show you the rest of my mantle except it needs some serious work. This is a good start though!  And just so you know I took this picture at 6pm. I love daylight savings time! And I got a sunburn at the park yesterday.  Yay for spring!
Photobucket

Sunday, December 27, 2009

Craftaholics Anonymous Gift Exchange

I signed up to do a gift exchange on a super cute blog Craftaholics Anonymous.  It was funny because the person I got a gift from was going to give me some countdown blocks but saw that I had made some.  So she sent me something else that was what I had considered sending. I guess great minds think alike!


Here is my Wise Men Still Seek Him tile I got from Leslie!  I hope she sees this cuz I accidentally deleted my email from her so I haven't said thanks yet.  So THANKS Leslie!  The best part?  I didn't have to make it!
Photobucket

Sunday, October 18, 2009

Spooktacular Frames


I got two of these 11x14 frames at Target for $3.00!  I have other ones in my house just like them that I didn't pay $3.00 for.  I love them though.  I need more on a wall in the dining room so I thought these might help.  I decided to use up some of the burlap I have to make some halloween-ish art.  I think it will work for just fall decor also.


Whoops I didn't rotate the photo.  But I cut an 11x14 piece of fabric (from the Spooktacular line) and used spray adhesive to glue it to the piece of cardboard that came in the frame.


I loved the swirls in the images I picked (from the DB Fright Night font) and I knew there was no way I could get that detail from stenciling so I cut them out on our vinyl cutter.  I put this tree on a 5x7 piece of burlap.


Then put that on the black and white fabric.


For the other frame I glued burlap to the cardboard insert then just put the pumpkin on the burlap.  I think the pumpkin was about 10x10.  


I hung them up a little off center next to my REALLY big star.


I am still trying to figure out what else to put up so I stare at this wall a lot but It definitely looks better.

I'm linking this to the DIY Show Off Fall Festival!

The DIY Show Off


LinkWithin

Related Posts with Thumbnails