Showing posts with label upcycling. Show all posts

Tuesday, November 19, 2013

Branchlers {a simple diy}


Branchlers! I've had a crafting itch lately and this was the perfect easy and fast diy to do during Axel's nap yesterday.  I even got the floors swept afterwards.  The hardest part (as always) has been deciding where to hang them.


Supplies...
a scrap of leather, wood plaque, paint, furniture tack or small nail, branch.

I collected all of these things from my craft room and the the branch I got from a tree in my backyard making it free, which I love.  If you don't have a black hole called The Craft Room then you can get the plaques for $1-2 at a craft store and while you are there you can get a grab bag of leather scraps.  I promise you will find other ways to use the leather.  


Start by painting your plaque.  While it is drying cut a piece of leather long enough to make a circle to fit around your branch.  Using a hammer, pound your nail in each end of the leather to punch holes. 


Put your tack through the holes to make a loop and then pound it into the plaque.


Set your branch into the loop and just like that you've made branchlers.  


Photobucket

Tuesday, April 3, 2012

How to grow grass in a can


Do you remember growing grass in a cup when you were little?  Its easy and perfect for teaching how things grow.  A little dirt, a little sunshine and some water and you have results in just a couple days!  Ivy has been faithfully checking how her grass is growing every morning.  Its even ready for a haircut!


All you need for this simple project is a couple of things you probably already have at your house, and a $3 bag of grass seed from the store.  We used tuna fish cans and some dirt from our empty planters outside.  {We are still waiting for that warm weather} Add some dirt to your can, then sprinkle a couple teaspoons of grass seeds on top.  Put your cans in a sunny spot, add a little bit of water and watch your grass grow!  


To cutify our cans a bit I cut strips of scrapbook paper 1.5 inches by 12 and wrapped the paper around the can.  I used double sided tape to adhere it to the can.   This step is easiest before you add the dirt to your cans.

After the grass grew tall enough to use as decoration we spread them around the house.  I took two small skewer sticks and made a little bunting with these two.  Just tie some string between the two sticks and cut some banners.  I  folded the tops over about a half inch and set them on the twine.  Its an easy way to decorate for spring!


If you want to get fancy you can also grow wheatgrass as decoration too.  Ours is just getting long enough to clip and start adding to our morning smoothies.  Wheat grass is just as simple to grow, using the same steps as above, but with hard wheat from your food storage.  If you don't have any hard wheat you can find the seeds at your local health food stores {sometimes called wheat berries} or online.  The only extra step is to cover your seeds lightly with dirt after you plant them.  Keep it watered lightly and in about 10 days you have wheatgrass to use as decoration and to add to all those green smoothies.  

Hope spring has sprung where you are!

Photobucket

Friday, November 18, 2011

Day 18. I'm Thankful with Lyssa Beth


Hey folks!  I hope you are enjoying I'm Thankful Week so far!  Today we have Lyssa here to tell you what she is thankful for.  I met Lyssa last year and she is always so kind and thoughtful.  

Hi guys!  My name is Lyssa Beth.  You can find me over HERE where I blog about my life as a mom, photographer, crafter, and organizer in the making.
I am so so excited to be part of Thankful Week over here with Jenn.  
I was lucky enough to meet and craft next to Jenn last year.  She's so genuine and kind!  It's just fun to be here and share with you something I made:)

So today, I am thankful for organization!
Can you imagine life without it?!  I can!  I've been there!
I am an infant hoarder with a love for garage sales and thrift store.  There is always something to be organized at my house!
Today, i'm tackling my headbands.  

I love to make these babies but how do you store them!?
Like this:


Fun huh?!  Well it's pretty simple but the end result goes a long way!

First you start with an oatmeal bin, some paper and a old candle holder:

Found this baby for a quarter at the local thrift store:


You add scrapbook paper around the oatmeal bin and you can even add fun embellishments like so: (did that with my fun ecraft machine...have you heard of it?  if not, check it out!)


Inside, you can even store other things that can't be hung or stuck on something.


Wha-la!  How easy is this?  But I love how it looks.  Very feminine and useful :)


Thanks again for stopping by and letting me share this fun idea with you over here at Ruffled Sunshine.  And Thanks Jenn for having me!

Thanks Lyssa.  Someday Ivy might wear something in her hair besides the once in a blue moon pontyail  so I will have to remember this idea for that day!
Photobucket

Monday, October 18, 2010

ROAR! {kind of a tutorial}


 Last week when I was picking up some ink for my printer I found a sweatshirt for Ivy.  Just a plain black one, nothing fancy but I knew I could fix that. 

I actually started out just wanting to add this giant ric rac to the hood.  You know, just a touch of color.  But I kept thinking how it kind of looked like dinosaur teeth.  We play a lot of dinosaurs around here so I guess it was just on my brain.  I'm not much of a sketch artist so I googled dinosaur silhouettes and found an AWESOME and perfect applique download.


I used that same grey shirt from Ivy's new pants, and some slinky pink polka dot pajama pants for the "longneck" as Ivy calls it.  I also used a stained white shirt and freehanded a pow bubble  {I'm not sure what its called but that sounds good!}to give it a bit more substance.  I applied wonder under to all three pieces then ironed them on to the back of the sweatshirt.  I then stitched around each piece to keep it in place.

 Now the front needed some work.  And since Ivy always needs a tissue, and a place to keep a tissue when we are outside, I decided to add some pockets. Here's where your mini tutorial happens so grab some scraps and lets make some pockets!

First I took a piece of paper and placed a corner where I wanted my pocket to be.  Draw out the size that you want and then cut out your pattern adding at least 1/4 inch for seam allowances.


Take your outer fabric and your lining and fold it WRONG sides together.  Then cut out your pattern from each.  This way you get one for each side of your zipper. 
Place the corresponding lining and main fabric pockets RIGHT sides together, pin,  and stitch around the pocket using a 1/4 inch seam allowance and the top open for turning.  Clip your curves and corners. 


Now turn your pocket right side out and press.  Fold in the top that you left open for turning and pin.  You will sew this shut when you sew the pocket on your sweatshirt.


Next up pin your pockets in to place on your sweatshirt.  Oh wait!  Before I stitched my pockets in place I added just a bit more embellishment.  


That qpplique download also has a smaller knee patch dinosaur that I thought would be cute peeking out of one of the pockets.   I cut out another smaller pow bubble and a small dinosaur. I unpinned part of the pocket and placed them where I wanted them, and appliqued in place. 


Finally I stitched my pockets on.  Start at the top of your eh, swoop and go across the top, down next to the zipper and then across the bottom.  DON"T stitch your swoop because then you won't be able to actually use your pocket! Make sure and backstitch really well at the beginning and the end for reinforcement.  


Whew, just about done.  I pulled out some teal embroidery floss to tie in the ric rac on the hood.  Using my disappearing ink pen I wrote ROAR on my small pow bubble then stitched over it.  I also stitched around the big pow bubble on the back to give it a bit more definition.  And finally added three little buttons to my other pocket.  

Now for the fun part!  


Showing Ivy her new dinosaur sweatshirt!
  

She hearts it!  


Yay! 

 
Photobucket

Friday, October 15, 2010

Leggings for the Lady


Want to know my favorite store for getting some great knit fabric?!  Old Navy {and Target}.  Yep, in this two fabric store town I have to look outside the box.  And the clearance section is a gold mine of XXL shirts just waiting to be utilized.  The best deals are definitely when Old Navy does their extra 50 % off sale, or after the holidays.  And remember that Shade sale?  My friend Karen was teasing me for going fabric shopping instead of looking for actual clothes. 

I got the Lil Blue Boo leggings pattern last Saturday afternoon while I was working at Greenies.  I was excited to get home and sew because it was a great rainy fall night.  Darin was shooting a wedding in Pendleton so it was going to be quiet and relaxing after Ivy went to bed.  Perfect.  Until I sat down to print it.

 *ERROR*  Grr.  My printer was completely out of ink.  Double Grr. So I cleaned the house instead.  Some Saturday night eh?!  Well I finally got some ink for my printer on Tuesday and was able to make Ivy some pants.


 I used a grey striped shirt from my knit stash.   The best part about using shirts for fabric is you already have finished edges.  And having a serger means that these pants probably took 10 minutes to make. Maybe even 9.  I love that about Ashley's patterns.  She is so precise and has great directions so I don't have to read them over and over again just to figure it out.  
 {warming our toes in the sun}

  Ivy's legs are like  a mile long and her waist is the same size it was 2 years ago.  That means I can't find jeans that fit.  Something she is secretly happy about.  So leggings it is for her.  Maybe I'll make her some jeggings ;)


Photobucket

Thursday, October 14, 2010

Mission Accomplished!

 Why yes!  I do like that hat!

  Its a scrappy, sassy little hat and its not perfect, but it is perfect for her.   
 
This is the first thing I have ever made for Ivy that she actually was waiting by the sewing machine for it to be done, and then she wore it the rest of the day.  And then asked for it the next morning. Seriously. That is what I have been waiting for.

I've been thinking about that this week as I've been sewing her some clothes for the cooler weather.  Do I sew her what she will love?  Or is it what I love and she will like. {and if I'm really honest, what I think you will like}?

Yep, I do. Because its not that she doesn't like what I make her.  She loves to tell people that I made what she is wearing.   But  she is more of her own little person every day. Gulp.  Which means I am going to have to let go of that control a little bit.  Gulp.  


This shirt is the perfect example.   One day we were at Old Navy and she saw it.  
And LOVED it. 
Me not so much. 
As in I pretended like we were going to get it.  Then didn't.  And as I was trying to leave without it, she asked where her bestest shirt was.  I didn't want to get it.  Really a dog with *bling*?! 
But I gave in and got it because she was so excited about it.   And its still her bestest shirt.  And I love it too.  Because it is TOTALLY her. 

 
{getting ready to do "sneaky time"}

Just like her hat.
+++

{tutorial found HERE from a new fave, I am Momma-Hear Me Roar}
Photobucket

Tuesday, September 21, 2010

Craft Projects for Project: Craft

Happy Fall Everyone!  
Ivy and I spent the last week in Portland so we are still getting back in to the groove around here.  It is always super fun hitting up the Big City!  The highlight for me was actually taking Ivy to the Children's Museum.  If the fire alarm hadn't gone off after 4 hours of playing we probably would have just stayed all day!
Well Project:Craft is this Saturday and after getting my ticket in the mail over the weekend I am getting super excited.  I just don't know what to bring as a craft!  And you probably haven't either I'm guessing ;).  So here's some ideas for you! {and me}

  I just pulled out my Halloween countdown and still love it!  
{I've got kits available for Halloween or Christmas.  Just email me if you want to make one!}
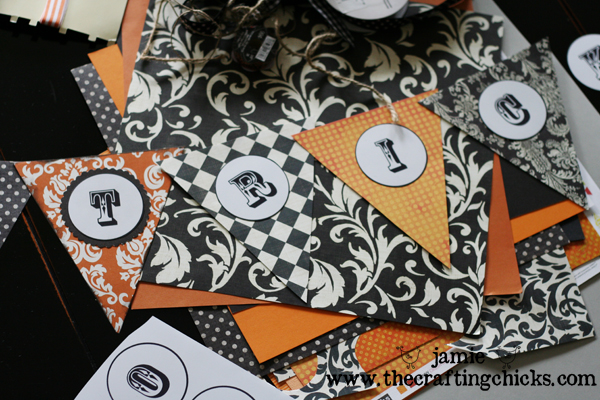
A pennant banner!  The Crafting Chicks share a super cute halloween one! I'm in need of a birthday one myself...
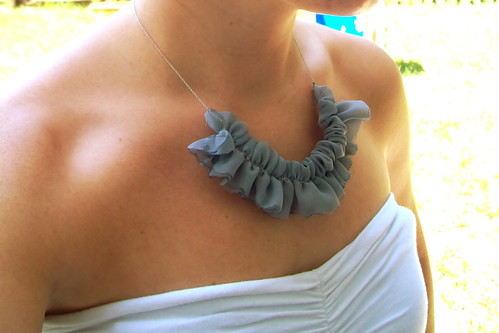
Not in the mood for a Halloween project?   How about this really cute ruffle necklace.  This has been on my list for a while so maybe its time to cross it off!
Or how about heading over to Target and picking up a pair of Odell Flats for a shoe refashion? 
Did I help you out at all?! What do you want to make this week?  {Whether you are going to Project:craft or not!} 
Photobucket

LinkWithin

Related Posts with Thumbnails