Showing posts with label ruffles. Show all posts

Monday, February 28, 2011

Spring Fever


 So I totally know we would be better friends if I actually posted more regularly.  But I had a fun week off learning new things and I actually sewed!  I lost my sewing scissors a couple of weeks ago which is a big deal if you are left handed.  Not just any scissors will work.  I finally gave in and used my rotary cutter to cut out a pattern. But only because it is the cutest dress ever.   LOVE IT. When I made it last week we had spring like weather.  Now, not so much.  Well, ok so we don't have the warm sunny spring like weather.  We have the blustery,rainy spring like weather.  Either way we definitely have spring fever around here.  How are you coping with your spring fever?

:: Spring Fever Pattern {Me Sew Crazy}
Photobucket

Friday, October 1, 2010

Dresses for Finley

{Darin will be our featured artist at Greenies this month for First Friday.  Come and check it out tonight from 5-8.  His display amazing!}

A few weeks back while I had my booth set up at the Richland Farmer's Market.  I got to chatting with Erin who also recently moved here from Colorado.  She had the best bag!  Anyways she asked me to make a few dresses for her cutest girl Finley.
   I couldn't resist taking pictures in the gorgeous sunlight this morning.  Pretty dresses hanging in the sunlight.  Little things like that make me happy!
Erin wanted fun and colorful and little bit funky.  I think we are a perfect fit!  I used some of my favorite fabrics of the moment.  Momo Wonderland is on the left and Heather Bailey Pop Garden on the right. 
 I used Hunky Dory for this one.  Ok.  So maybe the sunshine wasn't a great idea.  You can't fully appreciate the colors.  This one is SO pretty.  Each pattern I used is one that is one that Finley can wear for at least a year.  As she grows they will stretch, turn in to tunics and be cute forever!
This was a new style for me. And a new favorite.  They have a flat front and then the back of the chest piece is shirred so it will stretch as she grows.  The left dress is Kleo in black {an all time favorite} and the oh so cute deer fabric from Michael Miller on the right.  

Do you think she'll mind if I recreate them all for Ivy?!

DON"T FORGET TO ENTER THE DW PHOTOGRAPHY GIVEAWAY!  IT ENDS SOMETIME TODAY!  JUST LEAVE A COMMENT ON THE GIVEAWAY POST HERE OR SCROLL DOWN A LITTLE BIT!
Photobucket

Tuesday, September 21, 2010

Craft Projects for Project: Craft

Happy Fall Everyone!  
Ivy and I spent the last week in Portland so we are still getting back in to the groove around here.  It is always super fun hitting up the Big City!  The highlight for me was actually taking Ivy to the Children's Museum.  If the fire alarm hadn't gone off after 4 hours of playing we probably would have just stayed all day!
Well Project:Craft is this Saturday and after getting my ticket in the mail over the weekend I am getting super excited.  I just don't know what to bring as a craft!  And you probably haven't either I'm guessing ;).  So here's some ideas for you! {and me}

  I just pulled out my Halloween countdown and still love it!  
{I've got kits available for Halloween or Christmas.  Just email me if you want to make one!}
A pennant banner!  The Crafting Chicks share a super cute halloween one! I'm in need of a birthday one myself...
Not in the mood for a Halloween project?   How about this really cute ruffle necklace.  This has been on my list for a while so maybe its time to cross it off!
Or how about heading over to Target and picking up a pair of Odell Flats for a shoe refashion? 
Did I help you out at all?! What do you want to make this week?  {Whether you are going to Project:craft or not!} 
Photobucket

Saturday, August 28, 2010

Winner!! and Garland Tutorial

 Ok, If you are new around here you will soon learn that when I say I'll be back tomorrow sometimes that means in a couple days!  After all that ignoring my family time spent getting ready for the She Market I had to take a little break.  We played and cleaned.  Yesterday I had full intentions of going to the mall and getting some new jeans, but instead we spent an hour trying on Halloween costumes and two hours reading books at Barnes and Noble.  It was the best kind of productive day.  

But before we get to the tutorial we have some very important business to take care of!
The winners of a spool of baker's twine from 


 are....
#63   Rach {el Paulsen!}

#93 Lyssa said...
I posted about this giveaway on FB!

 #115 Amber said...I love twine! I am a new follower.
 
Congrats ladies!  Email me your info {makingitmyown@gmail.com} and the color of twine you want so we can get it to you lickety split!
 
Alright.  Here's how I used my twine this week!
 
I had this fun garland hanging on my tent at She Market.  Super easy and pretty quick if you have an easy way to cut circles!
 
 
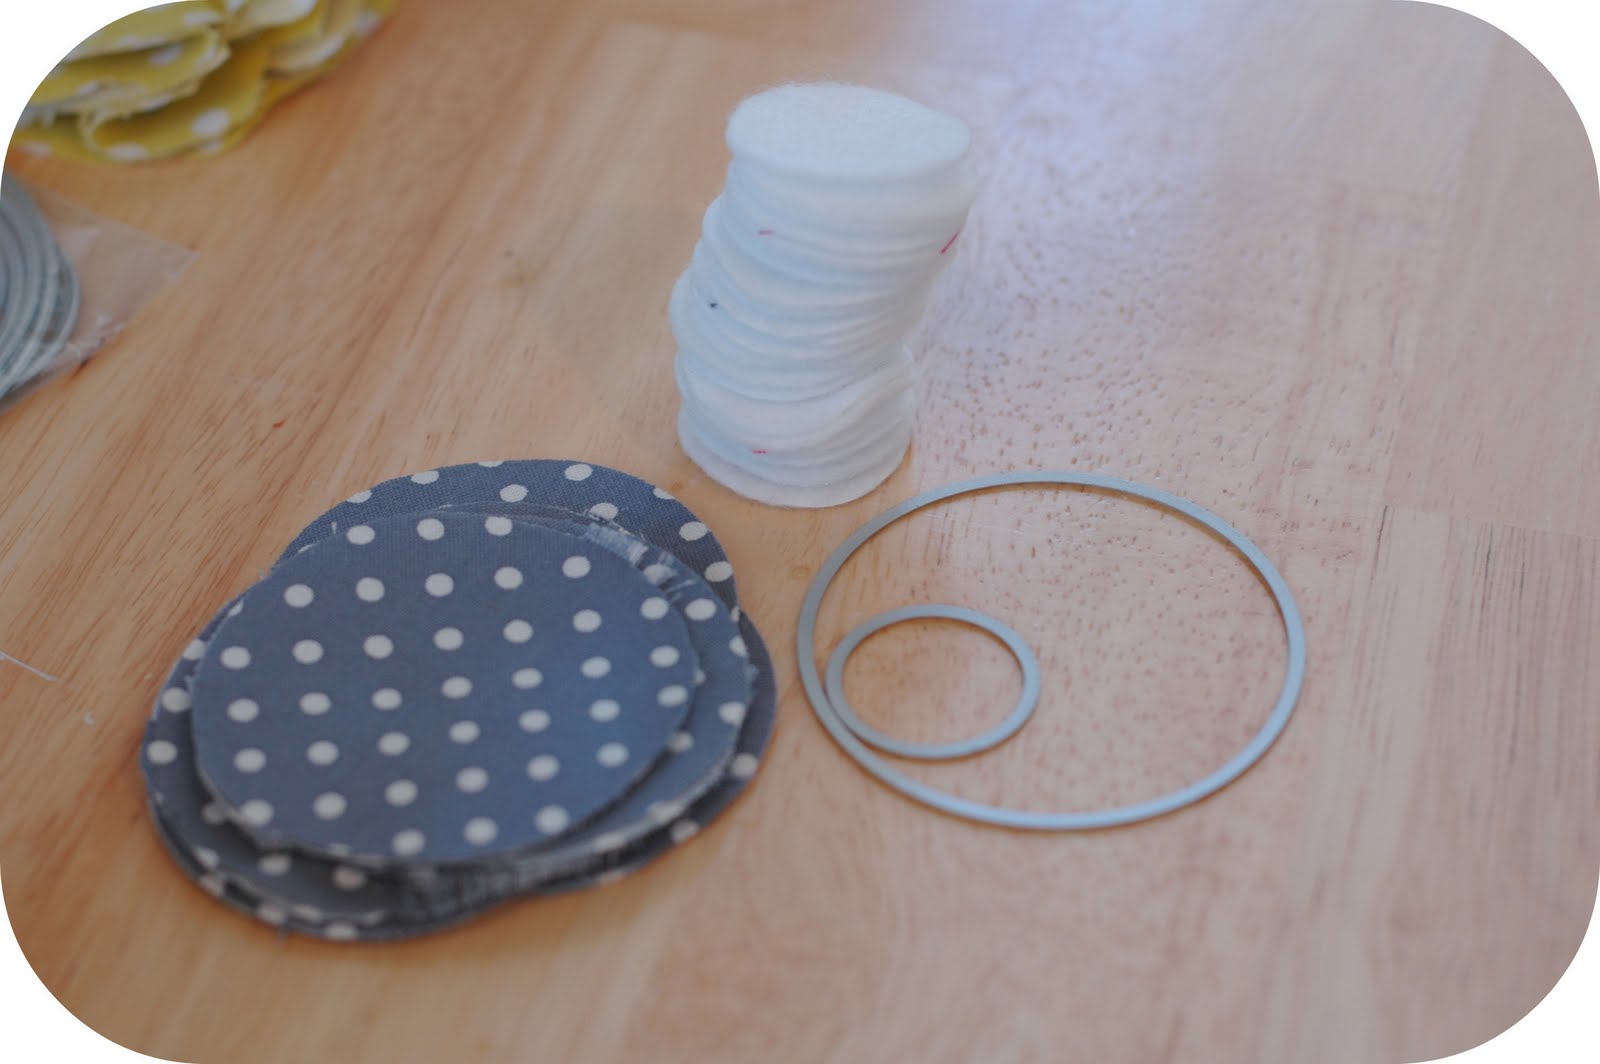
You are going to need a stack of felt circles about the size of a quarter, a stack of bigger circles {these are 2 1/2 inches} from your fabric of choice, hot glue, bakers twine and scissors.  
Want to know a secret about me?  I am seriously bad at cutting.  If it wasn't for things like rotary cutters and my Big Shot I would not get very far in this crafting world.  So for this project I used my big shot and my nestable circle dies to cut out my circles.  
 
 
To start out, take a fabric circle and fold it in half and then half again.
 
 
 Then glue that circle in the middle of a small felt circle {like the first picture}.  Then keep folding and gluing until it looks full.  I used five circles each.  You will soon realize that you need more fabric circles then you thought so cut some more and keep gluing.   Your gonna need a lot of these because it takes two for each pom pom.  


 When your done folding and gluing and have cursed your hot glue gun for being so mean to you, lay one poof felt side up.  Lay the bakers twine color of your choice over the middle like in the picture above.   Then take another poof, add some more hot glue to the felt circle and glue it on top, sandwiching the string like the picture below.  


Cute! 


On this garland I spaced them apart 4 inches.  I started on one side and put two 2x2 squares next to each other then added another.  This gives you about 6 inches of garland.  On my white one I spaced them six inches apart.  So three pom poms was 24 inches of garland, just to give you an idea.  Just keep gluing, just keep gluing...


When you have your desired length: hang, stand back and smile.  Aren't they fun!  


{I used white linen and aqua twine for this one, and for the colored one I used MM dinky dots in gray, Lotus in red from Amy Butler and yellow twine.}
And a side note to save you from hating your new garland...
If you are transporting this at all or putting it away, wrap it around a piece of cardboard to prevent it from getting tangled.  Because it will in about 2 seconds.  
Have a great weekend! 
 
Don't forget to use the code MAKEIT25 through Monday at The Twinery to get 25% off your order!  And become a fan of The Twinery on facebook to catch all of their fun deals and ideas!
Photobucket

Thursday, August 5, 2010

Watermelon Tuxedo Tank Tutorial

{oh my look how little she is!}
Crazy how time goes by so slow day to day but when I look back I can't believe its been a year.  I made this watermelon tank for my little lady last year because she is a watermelon fiend.  She just eats and eats until she is stained orangy pink.  Well its melon season again so I thought I would make an update on her favorite shirt for my BIG girl for her birthday. 
{she keeps reminding me how she used to be a little tiny baby but now she is 3.}  So here's how to make a watermelon tuxedo tank for your big girl.  No matter what her size!
  SUPPLIES
white tank or shirt {this would be great for a stained shirt}
scrap of red fabric
green fabric of choice, probably with polka dots, or not ;)
black buttons
coordinating threads
normal sewing supplies like a machine.

I took my scrap of red and traced the neckline of my tank just under that edging to get the top to fit in there perfectly.
Then fold it in half and cut the shape you want so its even.  Mine kind of angled out and then curved at the bottom.  It might be a good idea to use some fray check at the top.  Slide it underneath the edging if there is space, pin in place and stitch with red thread.  I am digging my stretch stitch for shirts but its not necessary.  
IMPORTANT NOTE!!!
I'm gonna remind you now.  Always make sure that you aren't sewing the back of your shirt to the front when you are applique-ing.  Of course I would never do that but just a side tip!

Ok moving on.  Cut a strip of green fabric.  This depends on how ruffly you want your ruffle, and the size of shirt you are making.  This time I cut it I think 2 1/2 inches wide?  And it was maybe 40 inches long.   Fold your strip in half lengthwise, right sides together and stitch it all the way down.  Turn it rightside out and press your seam to the back.   Then ruffle it by sewing a gathering stitch down the middle and pulling the bobbin threads.  
{ I'm assuming you know how to do that now, so just google how to gather if you need a refresher!}

Pin your ruffle right on your stitching line on the bib.  Last year I pinned it on the outside of the bib and after I washed it it there was a space between the ruffle and the bib.  So make sure they overlap just a bit.  

 Stitch in place right over your gathering stitch. 

Add three black buttons and your done!
Now go put it on your BIG girl and eat some watermelon!  Just make sure she wears a bib so she doesn't rip it off when she's done because her shirt is wet and can't stand it!

giveaways

Photobucket

Sunday, June 13, 2010

Summer Onesies

Once Memorial Day comes around I fall in love all over again with red, white and blue.  My favorite combo this year?
You know it had to have damask and polka dots!  These were some of the onesies I made for the Farmer's Market.
There isn't anything much sweeter than a red polka dot bow.
And some ties for the little guys (also in red polka dot).  Doesn't it make a tiny part of your heart wish you had twins?!
Photobucket

Thursday, April 15, 2010

Gathered Pillow

When I was in Portland last week I got to go fabric shopping by myself!   It was very exciting.  I had been wanting to go to a little store in NE Portland called BOLT.  It is an area called the"DIY District".  Lots of cool shops and really fun area to check out.  This is my stack of fabric I got.  I came home and my sister said "I thought you were going to come back with $100 worth of fabric?!" And while this isn't $100 worth {only $40 Darin, don't freak out!} splurging on the good stuff doesn't get you so much..  The top green is Nicey Jane by Heather Bailey which you'll get a better picture of in a minute.  The pink  has a awesome lime green damask on it and blue I don't know what they are but super cute, black polka dots~imagine that~ and the gray is Organic Bamboo jersey.  That was the one I'm most excited about because you just can't get that stuff here.  .  Here is my ruffled project for the day...
isn't that Nicey Jane so pretty?!
It didn't turn out exactly as I pictured and I know technically its gathered but its the same idea.  I'm trying to add more color in our house.  And I'm trying to be better about mixing up fabrics that aren't from the same line.  So while Ivy was taking a nap after her 3 hours of bliss at the park I whipped this up.  I think I would do the gathered section a bit smaller next time but overall I love the effect.  
Hopefully I can find something ruffly that I can take pictures of and post for tomorrow cuz I'm looking to be outside ALL day tomorrow.  80 degrees WHAT!
Photobucket

Squeaking It In

Ok so its 11:30 pm and I technically didn't ruffle anything today.  I have an excuse though, the weather was gorgeous and we just had to go to the park~twice.  And I'm in the middle of making two purses for my sister in law who I just can't picture with a ruffly purse.  We'll see.  The first one I am totally making it up as I go.  So far, "sew" good!  But I'm not going to let you down if you were wanting your daily fix of ruffles.  Here are some ruffle projects that I have bookmarked to do sometime in the near future...
image via 2 Giggle Boxes
How gorgeous is this Rufflier from 2 Giggle Boxes?!  I got the biggest smile on my face when I saw it and I need one.   You have to check out the whole "tRuffles and tea" party.  No wonder she snagged the second place prize in the Ruffle Your Stuff contest!

The queen of ruffles is indisputably Disney of Ruffles and Stuff.  I'm loving her
image via Ruffles and Stuff 

With all this talk of ruffles are you wishing you could make your own ruffles?  HERE is a great tutorial at 

What are YOUR favorite ruffled things you've seen?!
Photobucket

Monday, April 12, 2010

Ruffles Inspired By The Gap

When I was in Portland last week I of course had to go shopping.  Even though I wasn't buying anything, the thought of going to a descent mall is so exciting to me.  My hometown mall even has a Forever 21 that is JUST accessories!   All you big city folks can just have a small laugh at my expense on that one.  We even went to Anthropologie which I could spend a great deal of time in looking at every. single. thing.  But where did something catch my fancy?  The Gap.  Now don't get me wrong I love the Gap, but we do have one here in Tri Cities.  The reason this shirt caught my eye though was that I already had everything at home to make it!
All you need is about a yard of ruffle eyelet trim {or more if you want more ruffles like the original} , a shirt and your basic sewing supplies like pins and a sewing machine. 
Starting at the shoulder seam start pinning your trim right at the edge of the neckline on your shirt.  Pin all the way around to the other shoulder seam.  Oh look I even used a Gap shirt to make it more authentic;)
Sew right over the stitching lines on your trim, making sure that you are catching the shirt underneath.
I started my second row about 1 1/2 inches down from the shoulder seam and curved the end in under my top ruffle.  Then pin all the way around about 3/8 inch away from your first row of ruffles, stopping 1 1/2 inches from the shoulder seam again.  Sew that row of ruffle trim and repeat for a third row {or 4 or 5 whatever you want, I just went for 3}.
Here's the finished shirt.   The best part is by using trim the ruffle-ing is already done for you!  Making this the easiest thing I have done in a long time.

WOOT WOOT!  An updated Gap shirt for free~I already had everything I needed, and now I'm a little bit more stylin.


DIY Day @ ASPTL

Photobucket

Photobucket

LinkWithin

Related Posts with Thumbnails